
Curry Potato Salad
Curry dresses up potatoes for a side dish with a dash of heat
This spice blend dresses up potatoes for a memorable side dish with a dash of heat.

Mette Nielsen
Curry, the aromatic blend of warm spices, punches up the most ordinary foods. Take potatoes, this cold season’s reliable staple. Just sprinkle a little curry and a squirt of lime juice into the dressing for potato salad, and you’ve sparked a winning side dish. Add cooked chicken and you’ve got a light meal.
There is no rigid definition of curry, but it most often contains a mix of ginger, garlic, turmeric, chile peppers, cumin, fenugreek, fennel seed, caraway, cinnamon, clove, mustard seed, cardamom, nutmeg and black pepper. The ingredients will vary depending on the cook and the region’s influences. India, Pakistan, Bangladesh, Sri Lanka, Nepal, Indonesia, Malaysia, Thailand and the Caribbean all prize their own curries. It makes sense to find a blend or several blends to suit your individual tastes.
Potatoes work nicely with curry, as their neutral flavors can take the heat. The best potatoes for salads are the waxy varieties such as Yukon Gold, Red Bliss and fingerling. They have the least amount of starch and retain their shape when boiled.
Be sure to start the potatoes in cold water, not boiling, and to salt the water generously. The potatoes will absorb some of the salt so that they’re seasoned from the inside out. Be sure the potatoes are cooked thoroughly, so that they’re firm, not crunchy or overcooked and mushy. They should be barely tender when pierced with a fork.
This salad will hold a day or two in the refrigerator and so may be prepared ahead. Double the recipe for a party but save some for a weekday dinner. Curry favor and comfort with this down-home dish.
Curry Potato Salad
Serves 6.
• 1 1/2 lb. red, fingerling or new potatoes, scrubbed
• 2 tsp. salt
• 1/4 c. mayonnaise
• 3 tbsp. whole milk yogurt
• 2 tbsp. curry powder, or more to taste
• 1 tbsp. fresh lime juice, to taste
• 1 small red bell pepper, seeded and diced
• Salt and freshly ground black pepper, to taste
Directions
Place the potatoes in a large pot with enough water to cover by several inches. Bring to a boil over high heat, add the salt, and reduce to a gentle boil. Cook until the potatoes are tender when pierced with a knife, about 15 to 20 minutes. Drain into a colander. Allow to cool enough to handle, then cut into 2-inch chunks.
In a small bowl, whisk together the mayonnaise, yogurt, curry powder and lime juice. Place the potatoes into a large bowl along with the bell pepper, add the dressing and toss to thoroughly coat. Season to taste with salt and pepper. Serve warm, at room temperature or cold.
Beauty Heart Radish Salad
Surprise is inside with the Beauty Heart radish
Be on the lookout for the Beauty Heart, a bright spot among winter vegetables.

Mette Nielsen
Beauty Heart radishes won me over the moment the produce guy at the co-op cut into a big one with pale green skin and white shoulders. I’d assumed it was an odd variety of turnip. But inside this radish is a vibrant magenta “heart.” Displayed amid the dowdy parsnips, rutabaga and beets, the cut beauty is fetchingly garish. Rumor has it that this variety of winter radish was originally called “meat radish,” until a marketing-savvy Wisconsin farmer landed on a more appealing name.
Winter radishes are bigger than their tiny spring cousins (red cherry bell or the oblong French breakfast) and take much longer to mature. Beauty Heart, like the long white daikon, is harvested in the fall and stored far into winter. Members of the broccoli family, radishes are prized in China for their peppery flavors that cleanse the palate and are often served between courses. They’re a great source of potassium, fiber and vitamin B.
The Beauty Heart’s flavor is milder than other radishes — almost sweet. It will perk up an appetizer plate and simple salad. The Beauty Heart is spectacular when thinly sliced and served on open-faced sandwiches of dark rye spread with sweet butter and sprinkled with a little coarse sea salt. Thinly sliced, the Beauty Heart is also wonderful added to stir-fries at the very last minute or floated on top of creamy soups. It’s also mild enough to enjoy on its own as a quick snack.
Look for these beauties at winter farmers markets, area co-ops and most grocery stores; but do watch for them because they’re easy to miss.
Beauty Heart Radish Salad with Lemon Vinaigrette
Serves 4 to 6.
Note: Spectacularly simple and simply spectacular, this recipe is great on a buffet table or served as a first course. Meyer lemons are mild and fragrant, a nice choice for this vinaigrette. Ricotta salata cheese is a salty soft sheep’s cheese. From Beth Dooley.
• 1 large Beauty Heart radish
• 1 tbsp. fresh lemon juice
• 2 tbsp. extra-virgin olive oil
• Pinch coarse salt
• Few grinds fresh pepper
• Pinch sugar
• 1/4 c. crumbled ricotta salata cheese, or goat cheese, or more as needed (see Note)
Directions
Cut the radish in half horizontally. Using a mandoline or very sharp knife, slice the radish very thin. Arrange the slices on a serving platter or individual plates.
In a small bowl, whisk together the lemon juice, oil, salt, pepper and sugar. Drizzle over the radish slices and then sprinkle the cheese overall. Serve immediately.
Smoky Tri-Bean Sweet Potato Chili
Chili is Minnesota's winter staple
Reach for the sweet potatoes for an unexpected flavor in this cold-weather dinnertime favorite.

Mette Nielsen
Chili is the perfect one-pot winter meal. It’s quick and warming and possible to make with locally grown dried beans and sweet potatoes.
You can find the local dried beans in co-ops and winter markets. Look for Jacob’s Cattle (with white and red spots), Marfax (tiny brown beans), Swedish Brown beans (larger brown beans), and cranberry (a deep maroon). They all add color and flavor to any soup or stew. Because all dried beans are relatively neutral in flavor, they may be used interchangeably, so if the local heirloom beans are not available, any of the common varieties will do nicely.
The biggest difference is between canned and dried. Canned beans, as convenient as they are, seldom taste as good as those cooked at home. But there are times when they save the day. I prefer the brands from natural food companies, such as Eden. Though more expensive than others, the textures are better and beans are far less salty.
Soaking beans before cooking reintroduces moisture, shortens the cooking time, and makes it easy to remove the over-dry or immature beans that float to the surface. Soaking also helps make the beans more digestible.
For an overnight soak, cover the beans with water at least four times their volume and allow to stand at room temperature overnight (or at least for four hours).
Lacking time, quick-soak the beans by covering them with four times their volume of water, bringing to a boil for a full minute, then allowing them to stand for one hour.
Once the beans have soaked, pour off the soaking water, cover with 2 inches of fresh water and bring to a rolling boil for about 10 minutes. Scoop off the scum from the surface. Then reduce the heat and simmer the beans until they are soft and creamy, but not falling apart.
The cooking time will depend on the type of bean and its maturity, but most take between 45 minutes and 1 ½ hours. Once the beans are cooked, drain before using. They can be held in the refrigerator for several days in a covered container.
This chili recipe works well with both freshly cooked and canned beans. I like using a mix of beans for color, but a single variety works equally well. The chili tastes even better the next day.
Smoky Tri-Bean Sweet Potato Chili
Serves 6.
Note: From Beth Dooley.
• 1 tbsp. vegetable oil
• 1 c. chopped onions
• 3 c. diced sweet potatoes
• 2 garlic cloves, minced
• 1 chipotle in adobo sauce, chopped
• 1/2 to 1 tbsp. chili powder, to taste
• 2 tsp. ground cumin, or more to taste
• 1 (14.5-oz.) can diced tomatoes
• 1 1/2 to 2 c. chicken or vegetable stock, as needed
• 1 c. each cooked or canned black, white and navy beans (3 c. total), drained and rinsed
• Salt and freshly ground black pepper to taste
• Chopped cilantro for garnish
Directions
Heat the oil in a large pot over medium heat and sauté the onion until translucent, about 5 to 7 minutes. Stir in the sweet potatoes, garlic, chipotle in adobo, chili powder and cumin, and cook, stirring until the spices smell fragrant, about 1 to 2 minutes. Stir in the tomatoes and stock, and bring to a simmer. Cook, stirring occasionally, until the sweet potatoes are tender, about 30 to 35 minutes, adding more stock if necessary. Stir in the beans and continue cooking until heated through, another 3 to 5 minutes. Season with salt and pepper. Serve garnished with the cilantro.
Parsnip Bisque
Parsnips offer good seasonal options
Eat with the season by using parsnips, which offer surprising flavor.

Photo by Mette Nielsen
Parsnips are perhaps the most unassuming and underappreciated members of the underground vegetable family. Sweet as carrots and earthy as squash, they are slightly nutty — reminiscent of chestnuts.
Parsnips turn creamy when boiled and mashed, and when oven-roasted, they become crisp on the outside and silky within. The flavor of parsnips works nicely with a variety of other flavors, from savory herbs such as parsley, thyme and rosemary, to the heat of ginger and chile peppers, to aromatic spices like curry, cumin and coriander.
Slather steamed parsnips with butter, then drizzle them with lemon, lime or orange for a delicious side dish.
You can still find fresh local parsnips in natural food co-ops and at the winter farmers markets. Look for the smaller roots and avoid the huge specimens that tend to be woody and have a tough central core. As with all roots, choose organic parsnips that are grown in chemical-free soil. Parsnips have a thick skin and are best peeled before cooking; use a sturdy peeler or paring knife.
To roast or sauté parsnips, it’s best to slice and blanch them quickly in boiling water, then drain and dry them before proceeding with a recipe.
Parsnips store at least a week when refrigerated in plastic bags. Low in calories, reasonably priced, available and good tasting, parsnips also serve as the root of a good winter soup, as with this recipe.
Recipe: Parsnip Bisque
Makes about 4 cups (serves about 4 to 6).
Note: This lush soup tastes plenty rich and is satisfying but, surprisingly, contains no cream. It makes a fine light lunch or supper paired with a green salad and crusty bread. From Beth Dooley.
• 1 tbsp. unsalted butter or vegetable oil
• 1 c. chopped onion
• 1 lb. parsnips, peeled and chopped
• 1 medium-size Yukon Gold potato, peeled and chopped
• 3 sprigs fresh thyme
• 1 sprig fresh rosemary
• Pinch freshly grated nutmeg
• 3 c. chicken or vegetable stock
• Several shakes of hot sauce, to taste
• Salt and freshly ground pepper, to taste.
• 1/4 c. sliced green onions
• Chopped fresh parsley for garnish
Directions
In a large heavy pot over medium heat, melt the butter and saute the onion, parsnips and potato until the potato begins to soften and the onion is translucent, about 8 minutes.
Stir in the thyme, rosemary and nutmeg along with the stock. Bring to a boil, reduce the heat and simmer until the vegetables are very tender, about 20 to 25 minutes. Remove and discard the thyme and rosemary sprigs.
Puree the soup in batches using a blender or immersion blender.
Return the soup to the saucepan to warm through and season to taste with the hot sauce, salt and pepper. Serve garnished with the green onions and parsley.

Pickle Pearl Onions
A cocktail hour treat!
This quick technique offers up a ready accompaniment to dinner or happy hour.

My first taste of a pickled pearl onion was from my dad’s martini. The onion was crunchy and tart and a far cry from our Sunday dinner’s frozen pearl onions in “real” cream sauce. For years I stocked up on those “cocktail onions” for drinks and snacks until I discovered how easy it was to make my own. The onions I use are sold in 10-ounce mesh bags in the produce department, in the colors of white, red and gold. They add flavor and color to soups, stews and braises. But I like them best pickled.
These little onions are milder and just a tad sweeter than their larger cousins. They are grown commercially in high-density rows, then harvested while still small. There is an actual variety of onion called the “white pearl,” which is beloved by the French and Swedish. It is a different variety from the commercial onions and is grown mostly in home gardens. I keep a bag of the different colors on hand: The red are the sharpest tasting; the gold have a silky texture, and the white maintain their pure white color and snap once they’re peeled.
Like all onions, these pearls should feel firm and heavy, and look shiny. The skin around the neck should be very tightly closed. They shouldn’t have any soft or dark spots or sprouting. One sure way to see if the onions are fresh is to sniff them before buying. If the odor is strong, they may be past their prime.
Store these onions in their mesh bags in a cool, dry and well-ventilated place until ready to use. Light can cause them to turn bitter. Because they readily absorb moisture, keep them away from potatoes, which exude a natural gas that speeds the onions’ spoilage. Pearl onions are in season year-round and are good to pickle at any time.
To peel pearl onions: Pearl onions are thin-skinned, so they can be tricky to peel. The quickest method is to blanch them first in a pot of boiling water for about 30 seconds, then drain and cool them. The peels will slip off right away and the onions will be ready to use.
Pickled Onions
Makes about 3 cups.
Note: These will keep several weeks in the refrigerator. They make terrific holiday gifts. They're great as a condiment on a cheese platter and perfect in a martini. The red onions will turn the brine a very pretty shade of pink. From Beth Dooley.
• 3 c. pearl onions, mix of red, white and gold
• 8 cloves
• 2 sprigs fresh thyme
• 6 whole bay leaves
• 2 c. water
• 2 c. white wine vinegar
• 1/4 c. sugar
• 2 tsp. kosher salt
Directions
In a pot of rapidly boiling water, blanch the onions for about 30 seconds, drain and allow to cool. Slip off the skins and put into a large, clean jar or several smaller glass jars. Add the cloves, thyme and bay leaves to the onions.
In a medium saucepan stir together 2 cups water, vinegar, sugar and salt; set over medium-high heat and bring to a boil, stirring to dissolve the sugar and salt. Pour the brine over the onions. Cool and cover, then refrigerate. Allow about 2 to 3 days for the onions to pickle before serving.
Thanksgiving Side Dishes
Hot and Tangy Roasted Brussels Sprouts
Serves 6 to 8.
Note: Roasting the Brussels sprouts sweetens and caramelizes their flavor and gives them a toasty, crunchy edge. You can clean and cut the Brussels sprouts a day before, then roast them an hour or two ahead. They are delicious served hot, warm or at room temperature. Be warned that it’s tempting to eat them with your fingers as they come out of the oven, so add a few extra to the pan just for snacking. From Beth Dooley.
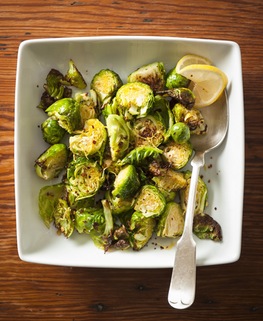
• 3 to 4 lb. Brussels sprouts, trimmed and cut in half
• 2 to 3 tbsp. olive or sunflower oil
• Coarse salt
• 1 tbsp. fresh lemon zest
• 2 tbsp. fresh lemon juice
• Pinch red pepper flakes
• Salt and freshly ground pepper to taste
Directions
Preheat oven to 425 degrees.
In a large bowl, toss the Brussels sprouts and the oil. Spread out on a baking sheet so the vegetables don’t touch. Sprinkle liberally with the salt. Roast until the sprouts are dark around the edges, about 20 to 25 minutes, shaking the pan occasionally.
Remove the sprouts from the oven and turn into a serving dish. Toss with the lemon zest, lemon juice and pepper flakes and season with salt and pepper to taste.
Cranberry, Orange AND Gingered Sweet Potato Wedges
Serves 8.
Note: Our local farmers are growing a wider variety of sweet potatoes each year. Some taste brown-sugary sweet, while others have a mild chestnut flavor. Here, cranberries roast along in the pan before they’re tossed with orange and fresh ginger for tang and heat. You can roast these ahead, store in the refrigerator, and reheat them to serve warm or at room temperature.

• 4 medium sweet potatoes (about 4 lb. total)
• 3 to 4 tbsp. sunflower or vegetable oil
• 2 tsp. ground coriander
• Salt and freshly ground black pepper
• 1/2 c. fresh cranberries
• 2 tbsp. sugar
• 2 tsp. grated orange zest
• 2 tsp. grated fresh ginger
• 2 tbsp. fresh orange juice, or more to taste
• Pinch red pepper flakes
Directions
Preheat oven to 400 degrees. Wash the sweet potatoes but do not peel. Cut the potatoes lengthwise in half horizontally. Cut again into 1/2-inch thick slices and then cut into 3 to 4 inch- spears. Brush the pieces with the oil and place on a baking sheet and sprinkle with a little salt and coriander. Scatter the cranberries overall. Roast until the wedges are tender and golden brown, about 25 minutes, turning the spears occasionally with a spatula so they don’t stick.
Remove the pan from the oven and sprinkle with the sugar, orange zest and ginger. Return to the oven so that the sugar creates a light glaze, about 3 to 5 minutes. Remove and transfer to a serving dish. Drizzle the orange juice over the sweet potatoes, and season to taste with salt, pepper and red pepper.
Roasted Squash with Warm Spices and Lime
Serves 8 to 10.
Note: You can make this entire dish ahead, store it covered in the refrigerator, and reheat it before serving warm or at room temperature. Leftovers are great when simmered with stock then puréed with a little cream for warming soup. I prefer butternut squash for this recipe. It’s the easiest to peel, and its flavor is nutty and sweet. From Beth Dooley.

• 2 medium butternut squash (about 4 lb.)
• 3 to 4 tbsp. sunflower or vegetable oil
• 2 tsp. grated nutmeg
• 1 tsp. ground cardamom
• 1 tsp. ground cinnamon
• Pinch red pepper flakes
• 2 to 3 tbsp. fresh lime juice
• Salt and freshly ground pepper
• 1/4 c. chopped fresh parsley
Directions
Preheat oven to 400 degrees.
Peel, seed and cut the squash into 2-inch pieces. Turn into a large bowl and toss with the oil.
In a small bowl, whisk together the nutmeg, cardamom, cinnamon and red pepper flakes, add to the squash and toss to coat. Spread the squash out on a baking sheet and roast until it’s lightly browned along the edges and tender, about 20 to 25 minutes.
Remove and turn onto a serving bowl and drizzle with the fresh lime juice and salt and pepper to taste. Serve garnished with the parsley.
Sweet and Sour Red Cabbage AND Apples
Serves 8 to 10.
Note: To keep the cabbage bright and crunchy, add the vinegar after it’s been lightly cooked. This can be made a day ahead, stored in the refrigerator and then gently reheated before serving warm or at room temperature. From Beth Dooley.

• 1 tbsp. sunflower or vegetable oil
• 2 shallots, peeled and chopped
• 1 medium head red cabbage, trimmed and cut into 2-in. pieces
• 2 large apples, cored, seeded and cut into 2-in. pieces
• 1/4 c. fresh apple cider
• 2 to 4 tbsp. vinegar, to taste
• 1 to 2 tbsp. maple syrup, to taste
• Salt and freshly ground black pepper, to taste
Directions
In a large deep pot, heat the oil and add the shallots; cook until the shallots are translucent, about 2 to 3 minutes. Add the cabbage, apples and cider, cover, and simmer until the cabbage is just tender, about 5 minutes. Remove the lid and stir in the vinegar, maple syrup, and salt and pepper to taste.
Spicy Apple-Quince & Cranberry Chutney

Mette Nielsen
Spice Bag:
1 tablespoon yellow mustard seeds
3 dry bay leaves
2 teaspoons allspice
2 teaspoons cardamom seeds
2 teaspoons coriander seeds
½ teaspoon whole cloves
Makes about 5 half-pint jar
1 pound cranberries
2 tablespoons sunflower oil
1 cup diced red onion
2 tablespoons minced garlic
2 tablespoons freshly grated ginger
1 teaspoon crushed red pepper flakes
1 tablespoon ancho chile
2 pounds apples, peeled, cored and chopped
1 medium quince, peeled, cored and chopped
½ cup rice vinegar
½ cup evaporated cane sugar
1 teaspoon salt
Directions:
In a shallow saucepan heat the oil over low heat and sauté the onion, garlic, ginger, red pepper flakes and ancho chile and cook until the vegetables soften and the mixture becomes very fragrant, about 5 to 8 minutes. Add the remaining ingredients and increase the heat to bring the mixture to a boil. Reduce the heat and continue cooking until most of the liquid has evaporated and the mixture is thick and sticky. It is ready when you can drag a large spoon across the bottom and the mixture stays separated, about 30 to 40 minutes. Discard or compost the spice bag. Spoon the mixture into clean jars, allow to cool before covering and storing in the refrigerator.
Cardamom Pear Jam
Keep those pears for later with sauce, butter and chutney

Makes about 4 half-pint (8 ounce) jars
2 pounds ripe pears, cored but not peeled and finely diced, about 6 cups
1 cup cane sugar
¼ cup water
3 tablespoons lemon juice
1 teaspoon ground cardamom
Put the pears, sugar, water, lemon juice and cardamom into a shallow sauté pan and set over medium heat. Bring to a gentle boil, lower heat, and cook, uncovered, until most of the liquid has evaporated, stirring occasionally to prevent sticking, about 25 minutes.
Ladle the jam into clean, hot jars and add the lids, remembering to leave ½ inch headroom. Wipe the rims and screw on the bands so that they’re finger tight. Allow the jars to cool completely before storing in the refrigerator or freezer. Tighten the bands before storing.

Herb-Roasted Garlic and Shallots
For extra flavor, roast the garlic and shallots

Mette Nielsen
The mellower taste comes from a long, slow turn in the oven.
Garlic and shallots are the backbone of a good sauce, soup, casserole and stew, adding substantial flavors that permeate the entire dish. And, given a chance, these ancient vegetables shine on their own when roasted with a little oil and a lot of herbs. That snappy flavor of fresh bulbs, whose bite is essential to salads and vinaigrettes, mellows and sweetens with low, slow heat as the garlic and shallots turn golden and silky.
When roasting them, it’s best to use the freshest bulb. Both the hard neck garlic (large, spicy cloves) and the soft neck (smaller, milder cloves) grow well in our region. Our local shallots are fat, juicy and mild, easy to handle and they make a fine match. When snugged together in the roasting pan, the more assertive garlic and sweet, mild shallot strike a nice balance. But you can choose to roast just one or the other.
This dish is terrific served as a side to roast beef, grilled pork chops or roast chicken. Or, purée the cloves and serve atop pizza or polenta; toss it with pasta, or stir it into rice.
The purée is also delicious whisked into cream cheese or chèvre to spread on bruschetta or sandwiches. Swirl it into sour cream, Greek yogurt, or hummus for a dip. Add a spoonful or two to boost soups, stews and sauces.
This recipe is easily doubled, keeps for a week and freezes beautifully. The roasty scents of these humble bulbs stir late fall hunger and promise good things soon to come.
Recipe: Herb-Roasted Garlic and Shallots
Serves 6 to 8.
Note: Straightforward and easy, this recipe yields magnificent results. You can choose to roast just the garlic or the shallots by themselves, but they are especially delicious when roasted together. The puréed garlic will keep several days, covered, in the refrigerator. From Beth Dooley.
• 5 to 6 heads garlic, cut in half horizontally
• 2 medium shallots, cloves, cut in half horizontally
• 1 tbsp. fresh thyme leaves
• 1/4 c. extra-virgin olive oil
• Salt and freshly ground black pepper to taste
Directions
Preheat oven to 300 degrees. Arrange the garlic and shallots cut side up in baking pan or ovenproof dish. Sprinkle the thyme over the garlic and shallots, drizzle with the oil, and lightly season with the salt and pepper. Cover with aluminum foil and bake until the cloves are very soft, about 30 to 45 minutes. Remove the foil and continue roasting until the cloves are golden, another 5 to 10 minutes, depending on the size of the cloves.
To serve, present the whole garlic halves and shallots in their skin on a serving plate. Or, squeeze the garlic and shallots from the heads into a food processor fitted with steel blade and purée.
Use on the side of meats, or purée and serve atop pizza, polenta or pasta, or stirred into rice. Also good whisked into cream cheese or chèvre and spread on bruschetta or sandwiches. A spoonful or two boosts soups, stews and sauces.
Slow-Cooked Broccolli
Roast your broccoli for rich flavor

Mette Nielsen
A little effort and a couple of hours in the oven produce a dish with versatility.
My grandmother cooked vegetables until there was no fight left in them, especially broccoli. She served it with plenty of melted butter and a squirt of lemon, and it melted right into the mashed potatoes.
So the notion of “tender crisp,” which works fine for carrots, kale, peas and asparagus, never seemed right for broccoli, with its much more aggressive flavor. Inspired by my grandmother’s approach, I’ve come up with another way to cook broccoli that also works well with Brussels sprouts, cauliflower and other crucifers.
Most broccoli recipes advise blanching before adding the broccoli to a stir-fry or braise. But really, what’s the point? Broccoli contains enough water that it will steam naturally without additional liquid if sautéed in a little oil or butter to keep it from sticking and then covered for a few minutes before going into the oven. Using this oven method, broccoli can be cooked far past the tender-crisp stage to become meltingly silky in texture, with a deep, rich flavor. It is transformed into a completely different vegetable that works beautifully with sharp, hot, spicy or pungent accents. While the method requires long, slow cooking time, it asks nothing of the cook once it’s set in the oven.
The simple technique yields a dish with terrific versatility. It’s great tossed with pasta and a little Parmesan cheese, or served on polenta or grilled bread, or arranged on pizza. It makes a great side dish for grilled or roasted chicken, pork and lamb, a filling for lasagna, a bonus in soup.
Roasted broccoli does not freeze well, but will keep nicely for about a week in the refrigerator.
But in this kitchen, it’s never lasted that long.
Recipe : Slow-Cooked Broccoli
Serves 4 to 6.
Note: This technique also produces delicious results with Brussels sprouts and cauliflower. Feel free to try different flavors after it’s cooked. Try drizzling it with a little balsamic vinegar instead of lemon, or substitute Cheddar cheese for the Parmesan. From Beth Dooley.
• 2 bunches (about 2 to 2 1/4 lb.) broccoli
• 1/4 c. olive oil
• 3 garlic cloves, cut in half
• Generous pinch crushed red pepper flakes
• Coarse salt and freshly ground black pepper
• 1 tbsp. fresh lemon juice
• 2 tbsp. shredded Parmesan cheese or more to taste
Directions
Preheat the oven to 250 degrees. Cut the florets off the broccoli. Peel the stems and cut them into thick slices, about 1/2-inch thick.
Put the olive oil and garlic into a large ovenproof skillet over medium heat. When the garlic starts to sizzle add the broccoli and generous pinch of crushed red pepper flakes. Season the broccoli with a little salt and pepper and stir well.
Cover the skillet and place in the oven to cook for about 2 hours, removing to stir once or twice, but trying not to break up the broccoli. It will be very tender when ready. Drizzle the broccoli with lemon juice and season to taste with more salt, pepper and crushed red pepper. Serve warm or at room temperature.
Nutrition information per each of 6 servings:
Calories 140 Fat 10 g Sodium 83 mg
Carbohydrates 11 g Saturated fat 2 g Calcium 102 mg
Protein 5 g Cholesterol 2 mg Dietary fiber 4 g
Diabetic exchanges per serving: 2 vegetable, 2 fat.

Looking for versatility at the dinner table? Reach for a potato!
There's a reason potatoes are a standby: They can be used in so many culinary ways.

Tom Wallace
Gotta love potatoes, which are not only comforting, versatile and easy to cook, but also always in season. Well, not really. There is a difference between those just harvested and potatoes stored in the bin for months. Fresh potatoes from nearby farms reflect the quality of the soil in which they are grown, like potatoes from the Driftless Area along the Mississippi River that evoke the mineral essence of its limestone cliffs.
Potatoes are the world’s most popular vegetable and the fourth-biggest crop (after wheat, corn and rice). The world of potatoes is defined by the spud’s starch content. Low-starch, high-moisture or waxy potatoes (aka boiling potatoes) are great for gratins and potato salad. These can turn gummy when whipped for mashed potatoes. High-starch potatoes (aka bakers) puff up to be light and fluffy in the oven and when boiled make terrific, airy mashers. Medium-starch potatoes such as Yukon Gold and Yellow Finn and Red Bliss are great in just about any dish.
No matter what the variety, new potatoes, about 1½ inches in diameter, are best when cooked quickly and treated delicately. Once blanched, they are wonderful in stir fries, sautés and salads, and can take the place of pasta or rice in any dish. Their natural starches help thicken the sauce and enrich a soup or stew.
Potatoes are a natural in curry recipes. They’ll turn a lovely gold, thanks to the spices, provide a neutral balance to the curry’s heat, and make a vegetarian meal more substantial. The potatoes can be cooked ahead and then added just before the dish is served. Unlike more mature potatoes that can be stored in a cool, dark place for several months, new potatoes turn soft and rancid quickly. Enjoy them now before they grow up!

Mette Nielsen
Indian Inspired Spinach and Potatoes
Serves 4 as a side dish, 2 as a main dish.
Note: You can add cooked chicken, pork or shrimp to make this meal heartier, but it’s very satisfying as a vegetarian dish
• 1 lb. new potatoes, scrubbed
• 1 tbsp. unsalted butter
• 2 garlic cloves, smashed
• 1 onion, thinly sliced
• 1 small green jalapeño, seeded and finely chopped
• 1/2 tsp. mild curry powder
• 2 tbsp. fresh lime juice
• 2 tbsp. water, or more as needed
• 1 1/2 lb. fresh spinach, trimmed, washed and shredded
• Salt and freshly ground black pepper to taste
• Plain Greek yogurt for garnish, optional
• Chopped fresh cilantro for garnish, optional
Directions
Put the potatoes into a large, deep pot with enough water to cover by 2 inches. Set over high heat, bring to a boil, reduce the heat and simmer until the potatoes are just tender, about 8 to 10 minutes. Drain and cool. Slice the potatoes 1 inch thick and set aside.
In a large skillet, melt the butter over medium-low heat and add the garlic, onion and jalapeño, and cook until the vegetables have softened, about 5 minutes. Stir in the curry powder, lime juice and water to make a thin sauce. Gently toss in the potatoes, then toss in the spinach. Cover the pan and continue cooking until the potatoes are warmed through and the spinach is just wilted, about 3 to 5 minutes. Season with salt and freshly ground black pepper. Garnish with the yogurt and cilantro, and serve.
Nutrition information per each of 4 servings:
Calories 156 Fat 4 g Sodium 106 mg
Carbohydrates 28 g Saturated fat 2 g Calcium 160 mg
Protein 6 g Cholesterol 8 mg Dietary fiber 6 g
Diabetic exchanges per serving: 1 vegetable, 1 ½ bread/starch, 1 fat.

Find your ginger and turmeric grown in Minnesota
Ginger and turmeric find a spot in local farms – and local kitchens.

Think ginger and turmeric are tropical roots? They’re being grown right here in Minnesota. Unlike the gnarled, tough fibrous rhizomes shipped in from tropical regions, these are mild, fragrant and so much easier to use.
Fresh ginger is a beautiful, completely edible plant. Chop the leaves and shoots to simmer into a tea or to flavor a stock. Wrap the leaves around fish for poaching, stuff the shoots into a chicken’s cavity before roasting, chop and toss the leaves into salads and stir-fries.
Fresh turmeric, like ginger, does not need to be peeled. Simply chop and toss it into curries, soups, stews and teas. It’s especially delicious with carrots. Its flavor is mildly woodsy and earthy, just a tad bitter, so add it to a dish slowly, adjusting to taste.
Happily, for me, whose market basket often overflows with too much great stuff, both these roots are very easy to freeze. Simply rinse them thoroughly to remove the dirt. Gently break the ginger apart to clean the crevices and cut off the stems. Pack and store the clean roots in a zip-top bag in the freezer. To use the frozen roots, remove and grate or chop, then add to the recipe. Both ginger and turmeric are terrific baked into cookies, gingerbread, apple and cranberry pies and cakes.
Several local farms are having a great year for both fresh ginger and turmeric so we’ll find them at winter’s markets, as well as at food co-ops. These new foods are redefining what it means to eat local. As Alex Liebman of Stone’s Throw said, “Growing new crops keeps things challenging. Ginger is one of the crops that provide excitement and variety for growers and cooks.”

Mette Nielsen
Aromatic Ginger-Turmeric Rice
Serves 3 to 4.
Note: Here’s a fragrant side dish for roast chicken or pork. Toss in cooked shrimp and you have a quick and easy meal. Local fresh ginger and turmeric are available at food co-ops and winter farmers markets. From Beth Dooley.
• 1 c. jasmine rice
• 1 tbsp. vegetable oil
• 1/4 c. minced shallot
• 2 tbsp. peeled and chopped fresh ginger
• 1 tbsp. peeled and chopped fresh turmeric (or 1 1/4 tsp. dried turmeric)
• 1 tsp. salt
• 1 1/2 c. water
• 1 tbsp. fresh lime juice
• 1/4 c. dried cranberries
• 1/4 c. toasted sunflower seeds
• 1/4 c. chopped fresh parsley or cilantro
Directions
Rinse the rice under cold water until the water runs clear.
Heat the oil in a medium saucepan over medium heat and sauté the shallot, ginger and turmeric until fragrant, about 2 minutes. Stir in the rice, salt and 1 1/2 cups water, increase the heat and bring to a boil.
Reduce the heat to a simmer, cover and cook until the liquid is absorbed and the grains are soft, about 15 to 20 minutes.
Allow the rice to stand for about 2 minutes before tossing in the lime juice, cranberries and sunflower seeds. Sprinkle on the parsley or cilantro right before serving.
Nutrition information per serving:
Calories 290 Fat 8 g
Sodium 600 mg Sat. fat 1 g
Carbs 50 g Calcium 31 mg
Protein 5 g Chol 0 mg
Dietary fiber 3 g
Diabetic exchanges per serving: 2 bread/starch, 1 ½ other carb, 1 ½ fat.
Quick raspberry jam makes use of the oven
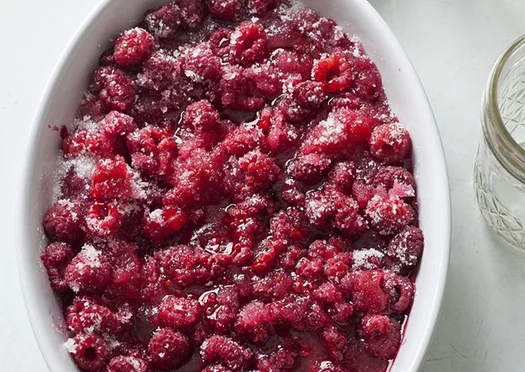
An old English recipe uses the oven to prep berries for a delicious spread.
Now that our raspberry canes are drooping heavy with fruit, it’s time to savor the rest of these summery days. Preserving such delicate berries needn’t mean hours at the stove in August’s dogged heat. My grandmother made super-quick jam relying on an old English recipe that uses the oven to retain the fruit’s shape and bright flavor.
The key is to make this jam in small batches rather than huge amounts, so there’s little stirring and no boiling. Lacking time, just package the berries up and freeze them to save so that you can make jam when the winter winds blow.
This quick oven method is great for delicate raspberries, blackberries, thimbleberries and currants. Heating the sugar first warms the berries before they hit the blast of the oven, so they cook through in less time. We also skip the water bath method that cooks the berries further after the jam has been made and put into jars, thus dulling the taste.
Raspberries burst with a balance of intense sweetness and acidity, and contain just enough natural pectin to create a mixture that’s thick and spreadable without the need for additional stabilizers or thickeners.
This raspberry jam will keep in the refrigerator for at least a month, but it’s so good, we wouldn’t count on it lasting more than a couple of days. It’s delicious folded into whipped cream to pile on shortcakes, dolloped onto pound cake or spooned over vanilla ice cream. For more savory uses, fold in chopped basil and drop onto chèvre for appetizers, add a chopped chile pepper for a sweet-hot salsa or stir in chopped rosemary to garnish a plate of chicken salad.
Soon as it’s gone, make more, and savor the summer jar by jar.
Super Quick Oven Raspberry Jam
Makes 3 half-pints
Note: This will be the freshest jam you’ve ever encountered. Cooking the raspberries in the oven rather than on the stovetop helps them retain their shape and bright taste. This will keep at least a month, covered, in the refrigerator. From Beth Dooley.
• 2 c. sugar
• 1 pint (2 c., about 3/4 lb.) raspberries
Directions
Wash 3 half-pint jars and lids with soap and hot water, then run through the dishwasher or set in a pot of boiling water for about 5 minutes to sterilize. Preheat the oven to 350 degrees.
Put the sugar into an 8- or 9-inch baking dish and warm in the oven for about 15 to 20 minutes. Remove and place in a bowl.
Put the raspberries into the baking dish and spoon the sugar over the berries, gently turning to mix in the sugar. Return the dish to the oven and bake until the berry mix is very hot but not boiling, about 25 to 30 minutes. Remove and stir gently, then ladle into the sterilized jars. Allow to cool to room temperature. Cover the jars and refrigerate. Enjoy sooner, rather than later.
Nutrition information per 1 tablespoon:
Calories 35 Fat 0 g Sodium 0 mg
Carbohydrates 9 g Saturated fat 0 g Calcium 1 mg
Protein 0 g Cholesterol 0 mg Dietary fiber 0 g
Diabetic exchanges per serving: ½ other carb.
Roasting brings out cauliflower's sweetness, heartiness
Versatile vegetable makes great side dish or entree.
Versatile vegetable makes great side dish or entree.

Mette Nielsen
Roasted to a toasty, crispy, deep brown, cauliflower’s starchy crevices turn all caramelized and nutty. This pale white cruciferous vegetable is better suited to roasting than it is to boiling or steaming into a limp, watery mass. When cauliflower is roasted, its subtle sweetness and slightly bitter edge turn robust and the texture becomes meaty.
What’s more, roast cauliflower is as delicious served at room temperature as it is sizzling hot from the oven. It makes a terrific side to roast chicken or lamb and is surprisingly perfect with seared scallops and shrimp because they, too, are naturally sweet.
But we’ve found that roasted cauliflower is so delicious it can take center plate. I admit that when I’m on my own, the recipe that follows, meant for four, actually yields just one very hearty serving.
For a main dish, top roasted cauliflower with crushed nuts or toasted breadcrumbs or sharp cheese and present on polenta, or toss it with dried fruit and a dash of lemon or orange juice and serve on saffron rice. Leftovers, if you have them, are great in a salad with chopped apples or pears and walnuts in a sharp vinaigrette.
These days, our farmers markets offer an array of colorful cauliflower with names such as “cheddar,” “orange bouquet,” “graffiti” or “purple cape” (both deep violet) and green (sometimes called “broccoflower”).
Because it is a member of the brassica family, cauliflower contains a ton of phytochemicals and antioxidants. But the main selling point is its delicious ease and versatility. So, double this recipe: Two roasted heads are always better than one.
Roasted Cauliflower
Serves 4 to 6.
Note: From Beth Dooley.
• 1 whole cauliflower, stem removed and trimmed, broken into florets
• 2 tbsp. extra-virgin olive oil
• 1 tbsp. coarse salt
• 2 tbsp. fresh orange juice
• 1 tbsp. orange zest
• 1/4 c. dried cranberries, optional
Directions
Preheat oven to 450 degrees. In a large bowl, toss the florets with the oil and spread out on a baking sheet so they do not touch. Sprinkle with the salt.
Roast, rotating the pan halfway through and stirring the florets, so that they are browned all over, about 20 to 25 minutes.
Transfer the cauliflower to a platter and drizzle with the orange juice, sprinkle with the zest and the dried cranberries, if using. Serve hot or at room temperature.
Nutrition information per each of 6 servings:
Calories 68 Fat 5 g
Sodium 970 mg Sat. fat 1 g
Carbs 6 g Calcium 24 mg
Protein 2 g Chol 0 mg
Dietary fiber 2 g
Diabetic exchanges per serving: 1 vegetable, 1 fat.
originally published by The Star Tribune

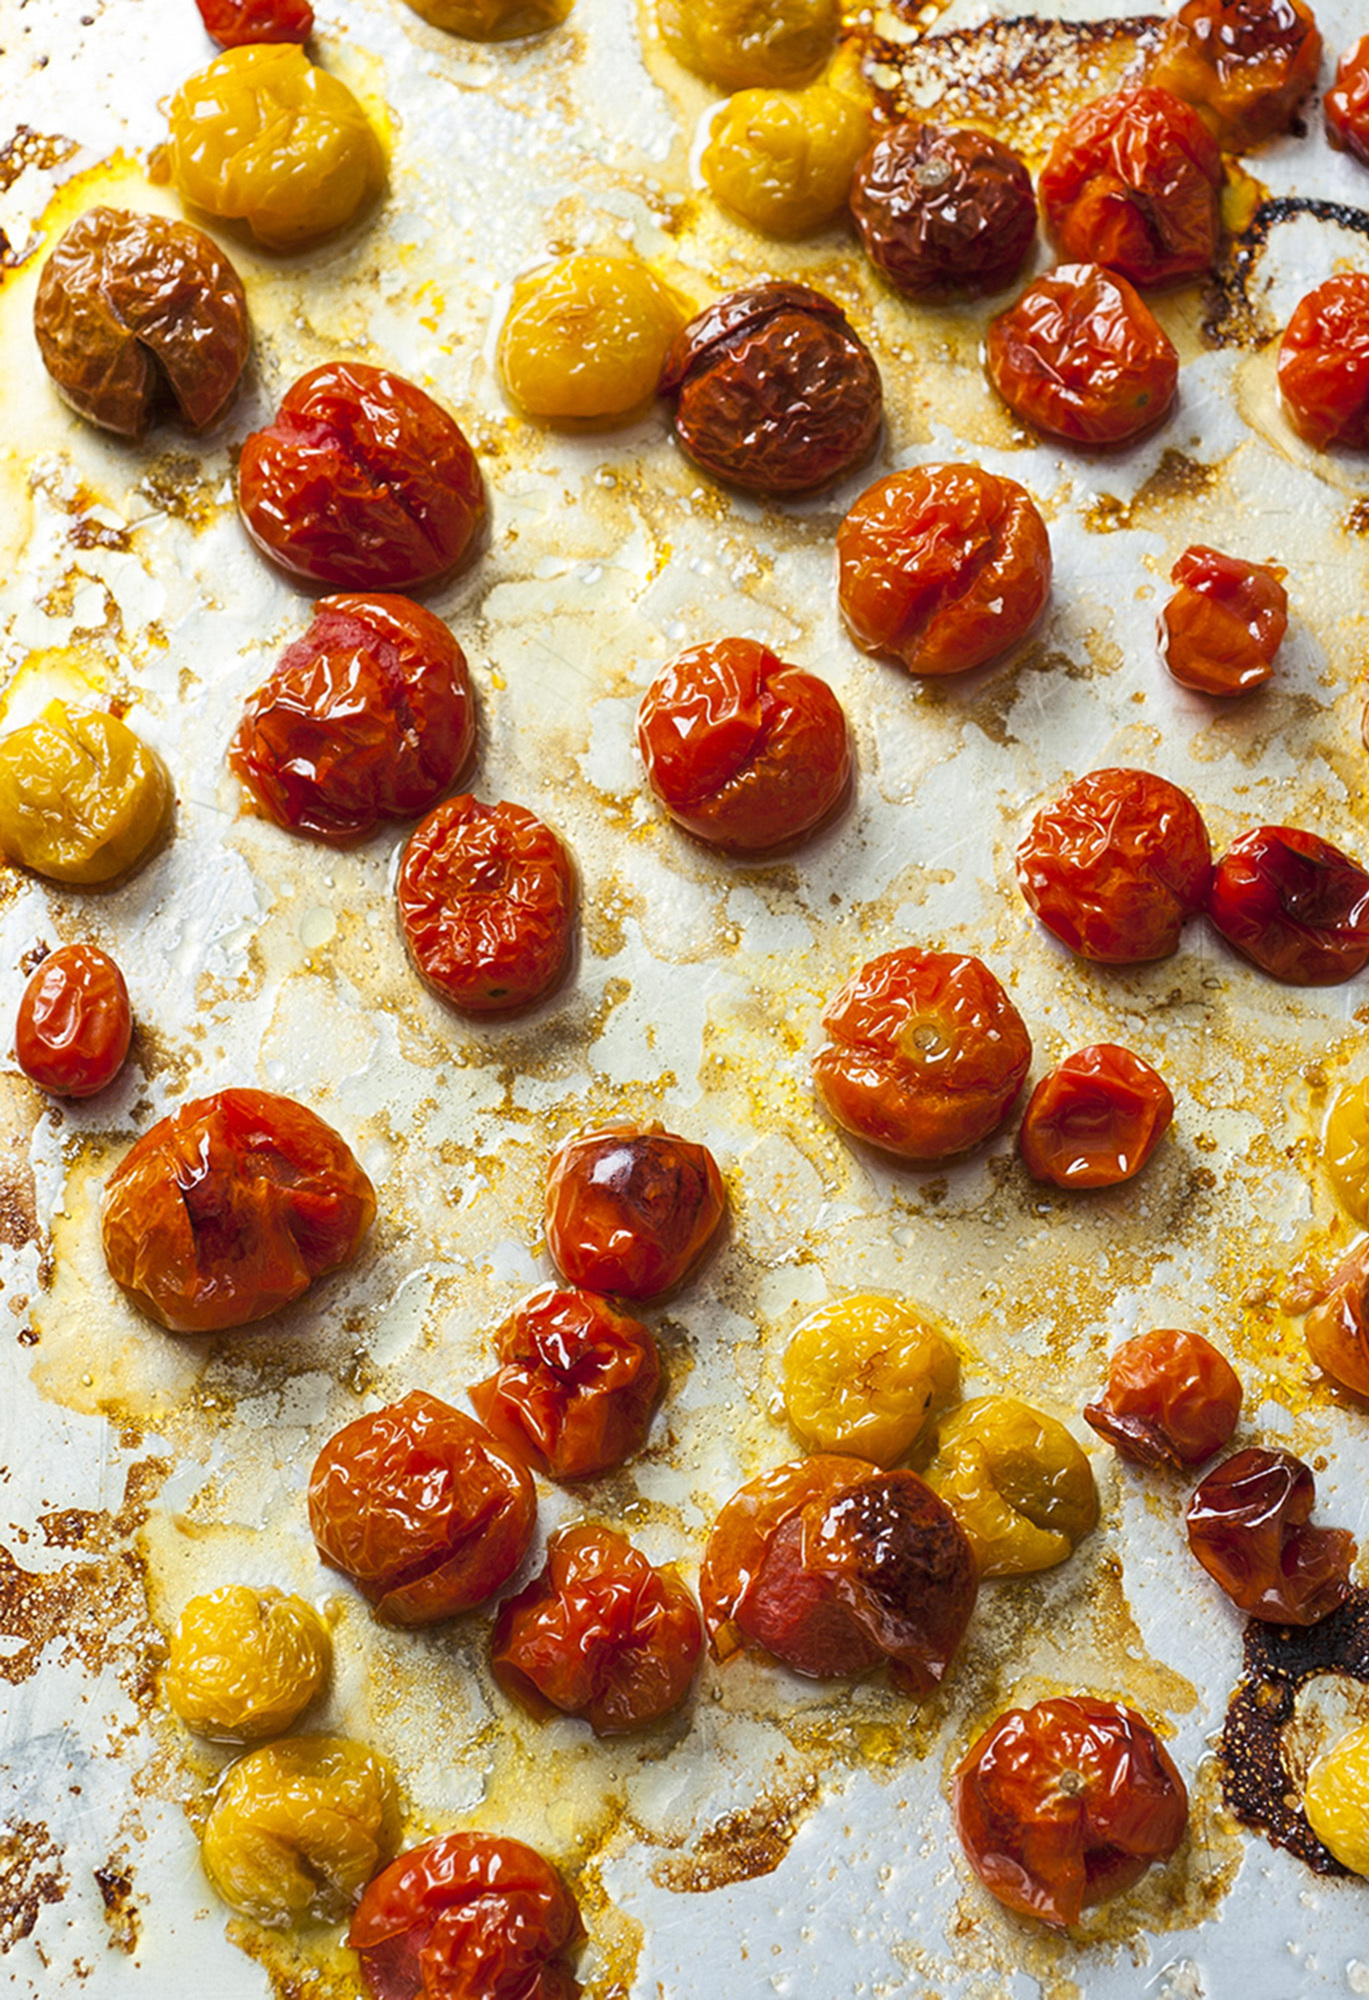
Roast cherry tomatoes for intense flavor

We expect a lot of our garden tomatoes. Too much, I think. I grew up in New Jersey, home of the robust, red “Jersey Tom,” so I can say with some authority that Minnesota tomatoes are, well, OK. Given this year’s cooler temperatures, they aren’t getting the heat and humidity that tomatoes require to cultivate the fruit’s deeply rich flavor.
It’s the smaller, less ambitious cherry tomatoes that have earned my summer love. Reliable and productive, the cherry varieties have ripened beautifully this year, to be firm and snappy sweet-tart. They’re flourishing in pots right outside my kitchen door, which makes them easy to move to be assured of plenty of sun. Not so incidentally, when ripe, they are within easy reach.
The cherry tomato varieties I am growing are the Sun Gold, Gardeners Delight and Yellow Pear, along with those blackish-brown small tomatoes that are a mini-version of Russian Blacks. These all make quick snacks for dips and are perfect for tossing into salads, pastas and sautés. There’s no need to skin or seed these tomatoes. In fact, much of the flavor resides in the gel that surrounds the seeds. The skins, though firm, are not worth the time and mess it takes to remove them.
Tomato flavor intensifies with the heat of the oven. While cherry tomatoes are fabulous fresh, their flavors are even brighter when roasted, as all the sweet-sharpness comes to the fore. When I have a big batch, I roast them all at once to top pizza and burgers later.
The best advice I ever received regarding fresh tomatoes (and many other things, for that matter) was from Mrs. Delliapiazza, who grew Jersey Toms in her garden and stored them in a big basket on her wooden cutting board.
“Never, ever put a tomato in the refrigerator,” she said. “Or basil, for that matter. They’re like me. They hate the cold.”
Mette Nielsen
Roasted Cherry Tomato Salad
Serves 4.
Note: This recipe is perfect for when you have too many cherry tomatoes. If you have a bumper crop, roast up a double amount and store in a glass jar, covered, in the refrigerator. Serve them on sandwiches, on top of grilled steak or chicken, and to top pizza. Cherry tomatoes roast beautifully; their skins wrinkle and shrink while the pulp collapses, releasing the tomato juices that mix with the oil for a fabulous dressing. From Beth Dooley.
• 3 c. mixed cherry tomatoes
• 1 shallot minced
• 2 tbsp. extra-virgin olive oil
• Coarse salt
• 1/2 lb. fresh mozzarella, cut into 1/4-in. pieces, optional
• 2 tbsp. balsamic vinegar
• 1/4 c. sliced fresh basil
• Salt and pepper to taste
Directions
Preheat the oven to 400 degrees. Toss the tomatoes and shallot with the olive oil and sprinkle with 2 pinches of the coarse salt.
Spread the tomatoes on a baking sheet and roast until wrinkled and starting to char, about 40 minutes, shaking the pan periodically so the tomatoes cook evenly.
Remove the tomatoes from the oven and while they’re still hot, gently transfer to a bowl. Add the mozzarella, if using, and gently toss in the balsamic vinegar and basil. Season with salt and pepper to taste.
Nutrition information per serving:
Calories 256 Fat 21 g Sodium 240 mg Saturated fat 9 g
Carbohydrates 8 g Calcium 223 mg
Protein 13 g Cholesterol 40 mg Dietary fiber 2 g
Diabetic exchanges per serving: 1 vegetable, 1½ high-fat meat, 2 fat.
Hot and Tangy Corn Relish

Mette Neilsen
Those kernels are good in so many different dishes.
It’s always hard to believe that there comes a time in the year when I think, “I’ve just had too much corn.”
Roasted on the grill with a splash of lime or blanched and slathered with butter, we’ve been eating it night after night as the main dish with a side of thickly sliced tomatoes and grilled bruschetta. But now I’m ready for some variety — succotash, corn salads, pasta, corn pudding.
Our farmers are growing a range of organic varieties, such as Ruby Jewel, Sugar Pearl, Brocade, Painted Mountain. This year a new variety corn, dubbed “Who Gets Kissed,” hit the market, developed by Martin Diffley, who with his wife, Atina, introduced us to wonderful heirloom corn when they farmed Gardens of Eagan.
Don’t limit your enjoyment of corn to the kernels. The cobs make wonderful stock and syrup. Simply put the cobs into a large pot, cover with cold water, bring to a boil and then reduce to a simmer until the liquid is reduced by half. Add a few herbs and you have a fine broth to use in soups and sautés. Or, stir in a little brown sugar or honey and continue cooking until it thickens into syrup. This is wonderful on blueberry corn pancakes and cornbread, or drizzled over vanilla ice cream.
One of the best ways to preserve a bounty of corn for the colder months is to make corn relish. It’s quick and easy, delicious served right away or keeps several weeks in the refrigerator; it also freezes nicely. As with any corn recipe, the key is to not to overcook it. Enjoy now and save some for later.
Hot and Tangy Corn Relish
Makes about 6 to 7 cups.
Note: Sparked with lime and chile, this relish is great on burgers, chicken, fish and black beans. Serve it with chips or on top of bruschetta. It will keep about two weeks, covered in the refrigerator. To remove the kernels from the cob, stand each ear in a large bowl and, using a sharp-bladed knife, scrape the kernels from the cob into the bowl. From Beth Dooley.
• 6 to 8 ears of corn
• 1 to 2 jalapeño peppers, seeded and diced
• 1 sweet red bell pepper, seeded and diced
• 1 tbsp. coriander seeds
• 2 tsp. mustard seeds
• 1 tsp. whole peppercorns
• Juice of 4 limes (about 1/3 c.)
• 2 tsp. chipotle chile flakes, or more to taste
• 2 tsp. salt, or to taste
• 1/4 c. sugar
Directions
Shuck the corn and cut the kernels from the cob (should have about 6 cups of kernels). Put the corn kernels, jalapeño and bell peppers, coriander, mustard seeds, whole peppercorns, lime juice, chile flakes, salt and sugar into a large pot, and set over high heat. Bring to a boil, stirring gently, then reduce the heat and simmer until the corn is tender, about 5 to 8 minutes. Remove and ladle into clean jars. Allow to cool before serving. Cover the jars and store in the refrigerator.
Nutrition info per 2 tablespoons:
Calories 18 Fat 0 g Sodium 85 mg Carbs 4 g Saturated fat 0 g Calcium 2 mg
Protein 1 g Chol 0 mg Dietary fiber 0 g
Diabetic exchanges per serving: 1 vegetable.
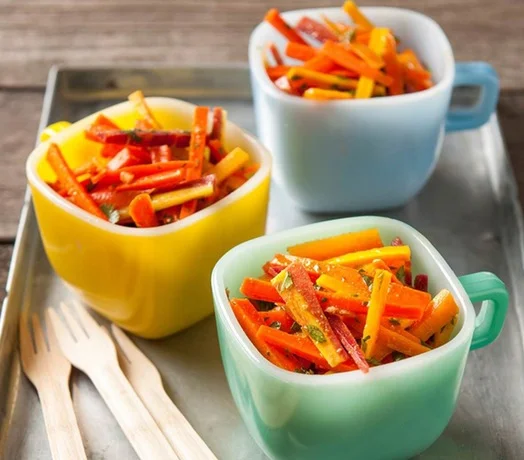
Carrot Salad With Coriander, Cumin and Cilantro
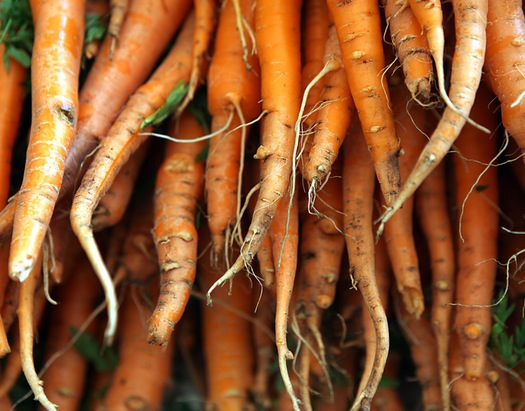
Mette Nielsn
Some 30 years ago, at the farmers market, the taste of a single carrot brought back memories of the fresh summer mornings I trailed my grandmother. She would thump melons, sniff peaches and swap recipes clipped from the newspaper with the farm women near her home on the New Jersey shore. As I exchanged money with a farmer, whose fingers resembled his thick, gnarled carrots, he assured me the lacy-topped roots he’d dug that morning had been raised without chemicals. In that first sweet crunch, I realized the relationship between how and where vegetables are grown and their flavor.
Our local carrots are perfect just as they are — sliced and served with a dip, sprinkled with lime, cumin and coarse salt, or tossed in a salad. In winter, carrots are the backbone vegetable on which to build layers of flavor in a stock or stew. The heirloom varieties — white, yellow, purple, violet, burgundy and plum — offer a range of nuanced flavors — earthy, citrusy, sugary.
I’ve seen older recipes for a pudding of carrots and honey. Historians write that the vegetable was first domesticated in Afghanistan. Its flavors are a good match with Indian and Middle Eastern herbs and spices — cumin, red chilies, turmeric, ginger, curry, cardamom, cinnamon, mace, nutmeg, cloves, coriander, fennel, black pepper, mint, basil, cilantro, as well as citrus.
Some food writers suggest including the leaves in dishes, but I find them bitter and distracting. In fact, it’s best to remove the tops and store carrots, unwashed, in a paper bag in the crisper of the refrigerator. Scrubbed carrots kept in plastic tend to turn slimy. If possible, buy them in bulk.
As a bonus, our growers are cultivating “storage” carrots that taste even sweeter several months after harvest. When stored carefully they will sweeten over time, with those flavors to be released in January and February. Enjoy local carrots now and look for the other varieties later in the year.

Carrot Salad With Coriander, Cumin and Cilantro
Serves 4 to 6.
Note: Use a variety of colorful rainbow carrots in this light, refreshing salad. You can make it a day ahead and bring it to a picnic. From Beth Dooley.
• 1 garlic clove
• 1/2 tsp. ground cumin
• 1/2 tsp. ground coriander
• Pinch crushed red pepper
• 3 tbsp. fresh lemon juice
• 1/4 c. extra-virgin olive oil
• 1 lb. carrots, cut into thin matchsticks
• 2 tbsp. chopped fresh cilantro or parsley
• 1 tbsp. chopped fresh mint
• Salt and freshly ground pepper to taste
Directions
Smash the garlic with the flat of a knife. Transfer it to a small bowl, then add the cumin, coriander, crushed red pepper and lemon juice. Whisk in the olive oil.
Put the carrots into a large bowl and toss with the dressing along with the cilantro and mint, and season with salt and pepper to taste.
Nutrition information per each of 6 servings:
Calories 114
Fat 9 g
Sodium 53 mg
Carbohydrates 8 g
Saturated fat 1 g
Calcium 30 mg
Protein 1 g
Cholesterol 0 mg
Dietary fiber 2 g
Diabetic exchanges per serving: 1 vegetable, 2 fat.

