
Shichimi Togarashi!
Shichimi Togarashi
Makes about 1/4 cup.
Bold, salty, hot and tangy, this spice blend is just right sprinkled over soba noodles, hard-boiled or poached eggs, and rice. Use it as a finishing spice on grilled fish and roasted tofu.
1/4 c. sesame seeds
1 tbsp. poppy seed
2 tbsp. red chile flakes, or to taste
1 tbsp. dried orange peel
1 tsp. peppercorns (Sichuan preferred)
1 tsp. ground ginger
1/2 sheet toasted nori
Directions

In a dry skillet set over medium heat, toast the sesame seeds and poppy seeds until fragrant about 1 to 2 minutes. Set aside.
Place the toasted sesame and poppy seeds, chile flakes, dried orange peel, peppercorns, ginger and nori into a coffee or spice grinder and pulse until coarsely ground (not powdered). Transfer to an airtight container and store in a cool, dark place for up to 9 months.

Sweet Pea on Toast! (Makes about 1 cup)
Skip the avocado … go with sweet peas for your toast. Local sweet peas are lush and creamy and use far fewer miles to get from the field to your kitchen.
Ultra-light, with just enough texture, this is a terrific spread to keep on hand. It’s terrific on thick whole wheat toast for breakfast, spread on sandwiches for lunch, tossed with pasta, or served as a dip for chips and veggies. It will keep in a covered container in the refrigerator for about 3 days. It makes quick. Use of lightly sauteed, stir-fried, or flashed peas.
1 clove smashed garlic
1 small red jalapeno, seeded, chopped, or more to taste
¼ cup fresh lime juice
½ to 1 teaspoon ground cumin
4 green onions, chopped
½ cup chopped fresh cilantro, plus more for garnish
2 cups mixed peas (sweet peas, chopped snow or sugar snaps peas), lightly cooked*
Salt and freshly ground black pepper, to taste
In a food processor fitted with a steel blade, pulse together the garlic, ½ of the jalapeno, lime juice, cumin, and onions until finely chopped.
Pulse in the peas until they become a chunky spread. Pass the remaining chopped jalapeno alongside.
*To flash cook the peas, drop them into a skillet of boiling water for 10 to 15 seconds. Drain and use right away.
Photo Credit: Ashley Moyna Schwickert
Wild Mushroom Medley
Using a mix of different mushrooms gives you a lot of bang for your buck. This recipe relies on a mix of shiitake, hedgehog, and chanterelle.
Fall | Entree | Jump to Recipe

Prep time: 5 minutes | Cook time: 30 minutes | Total: 35 minutes
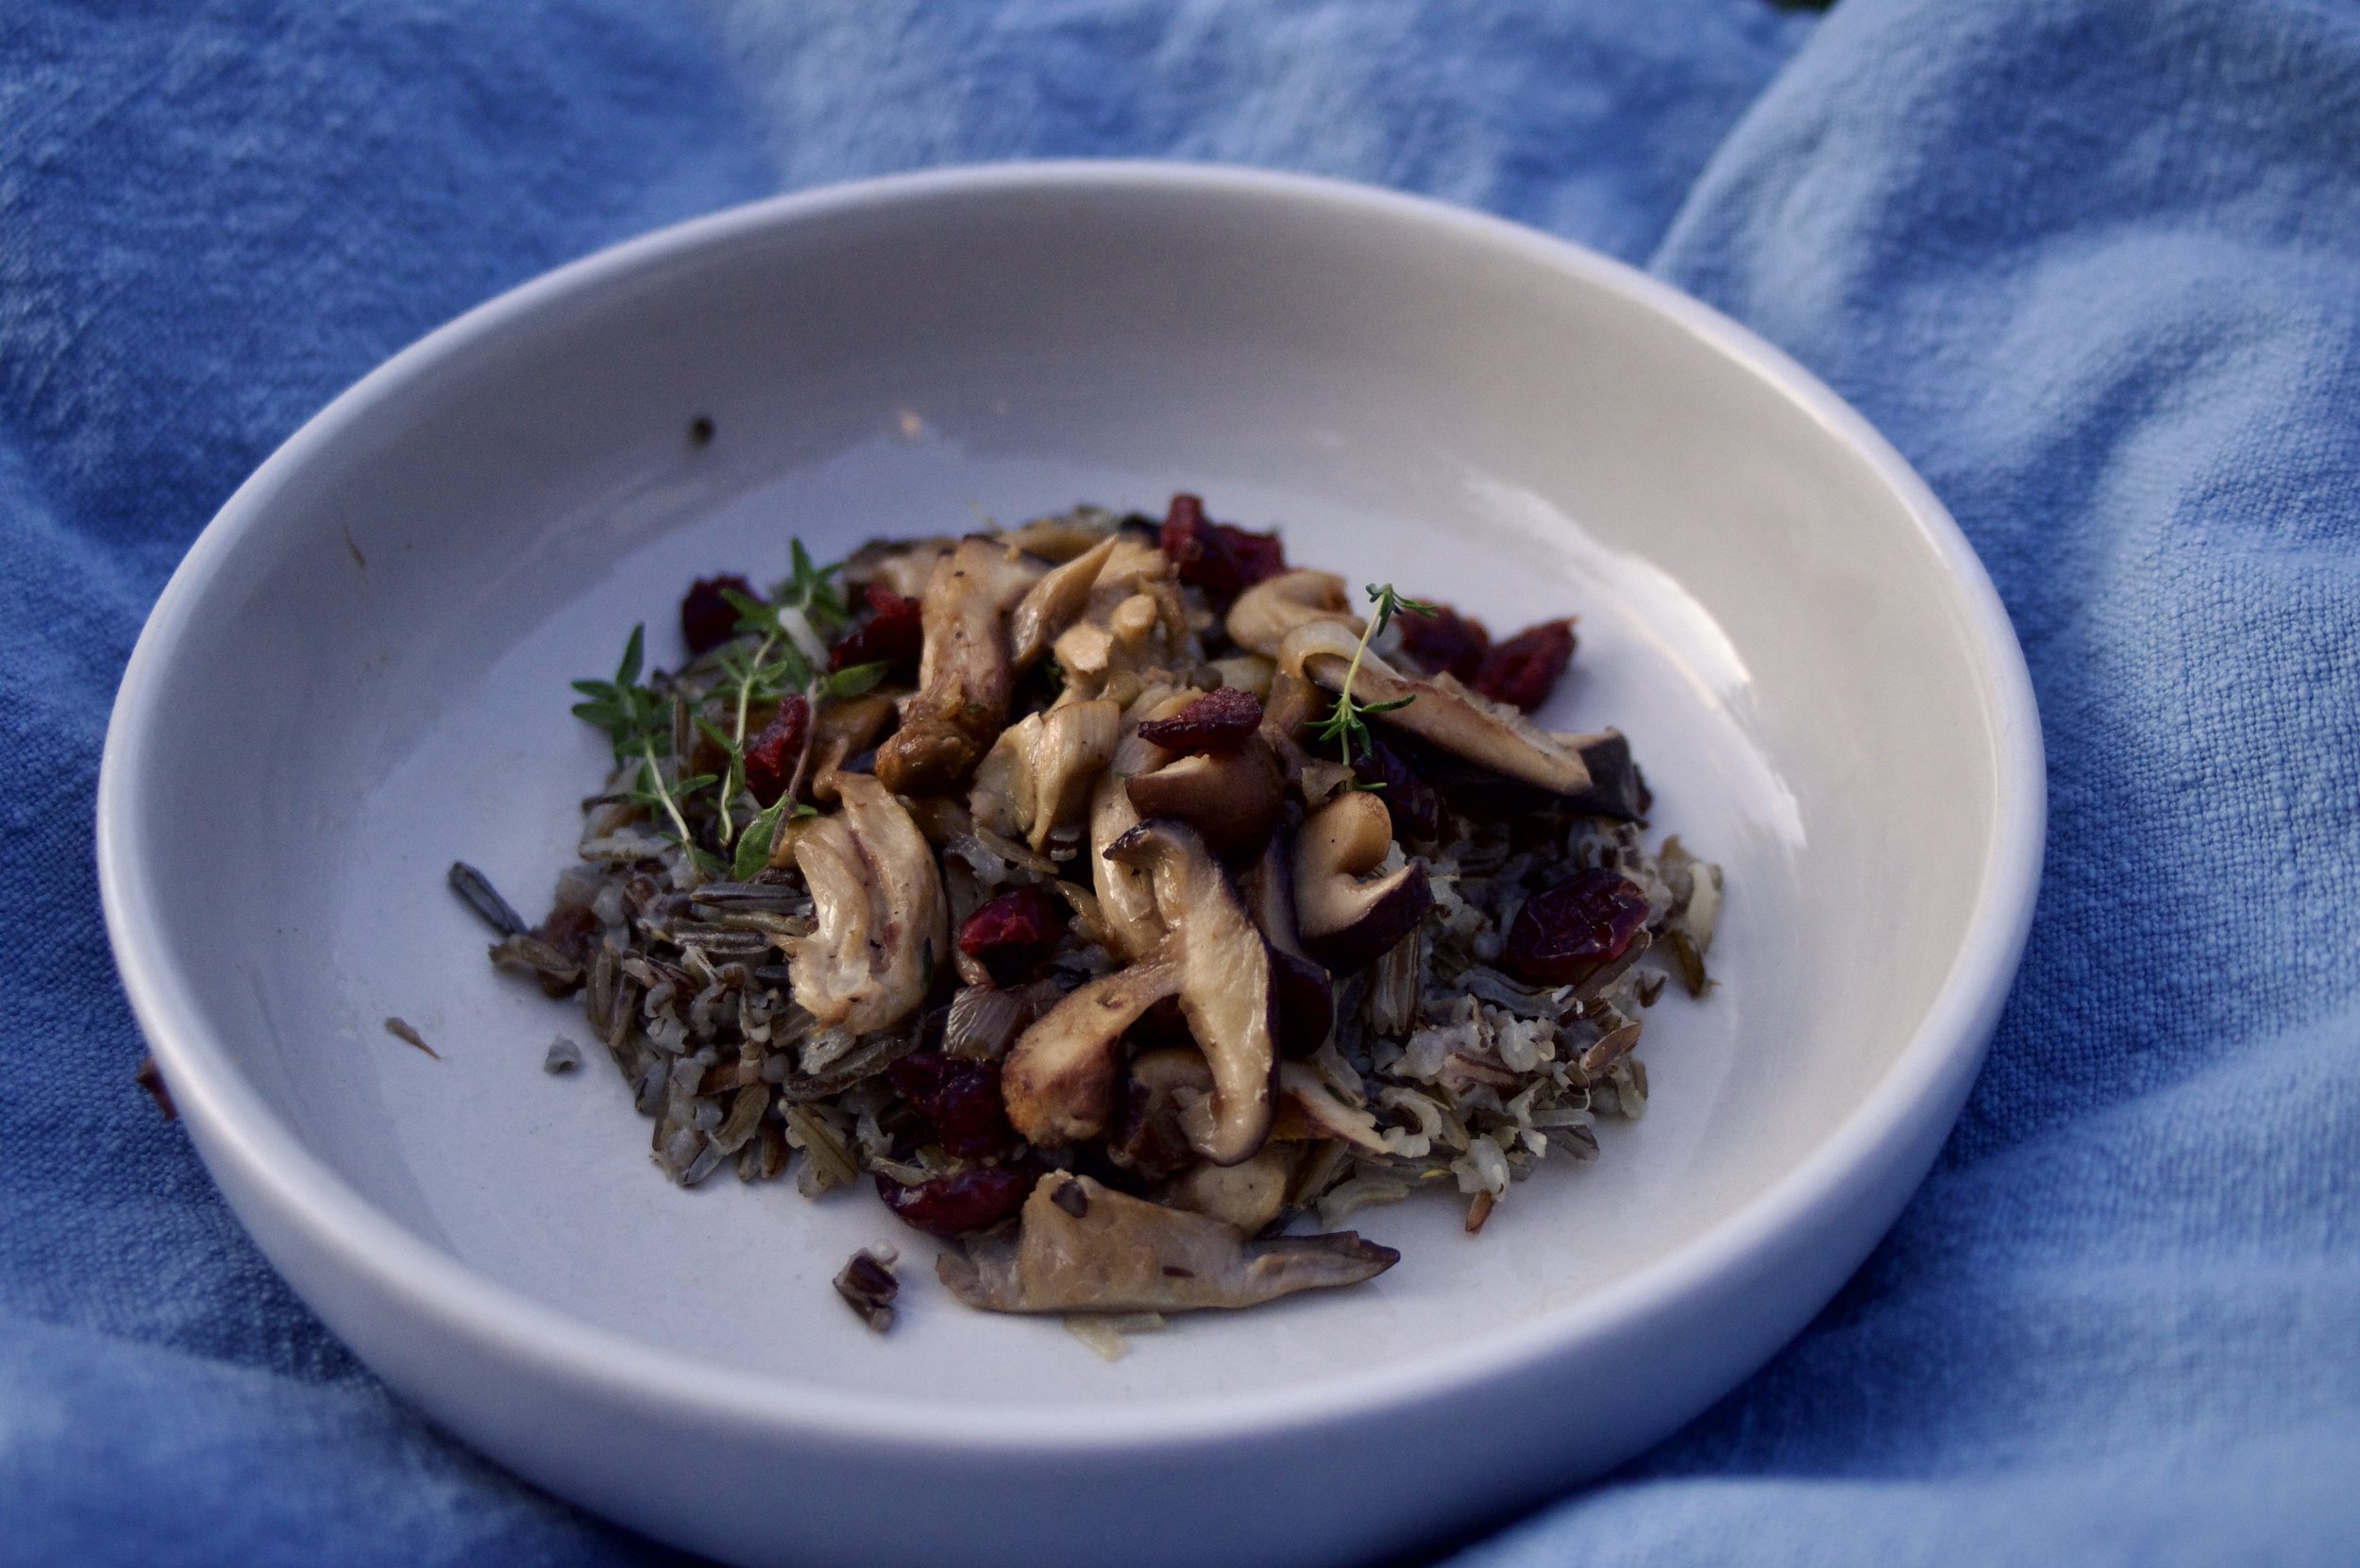
Wild Mushroom Medley / Kip Dooley
As summer rounds the corner, it feels as though life is accelerating. The air becomes crisper, cool breezes arrive in the evening as the light dims earlier and shadows lengthen. Here on Lake Superior, we’re putting up jars of carrots and beets in salt brines with loads of fresh garlic, a hedge against the colder, darker days to come, and we're savoring every last tomato.
Summer, you are hard to let go of.
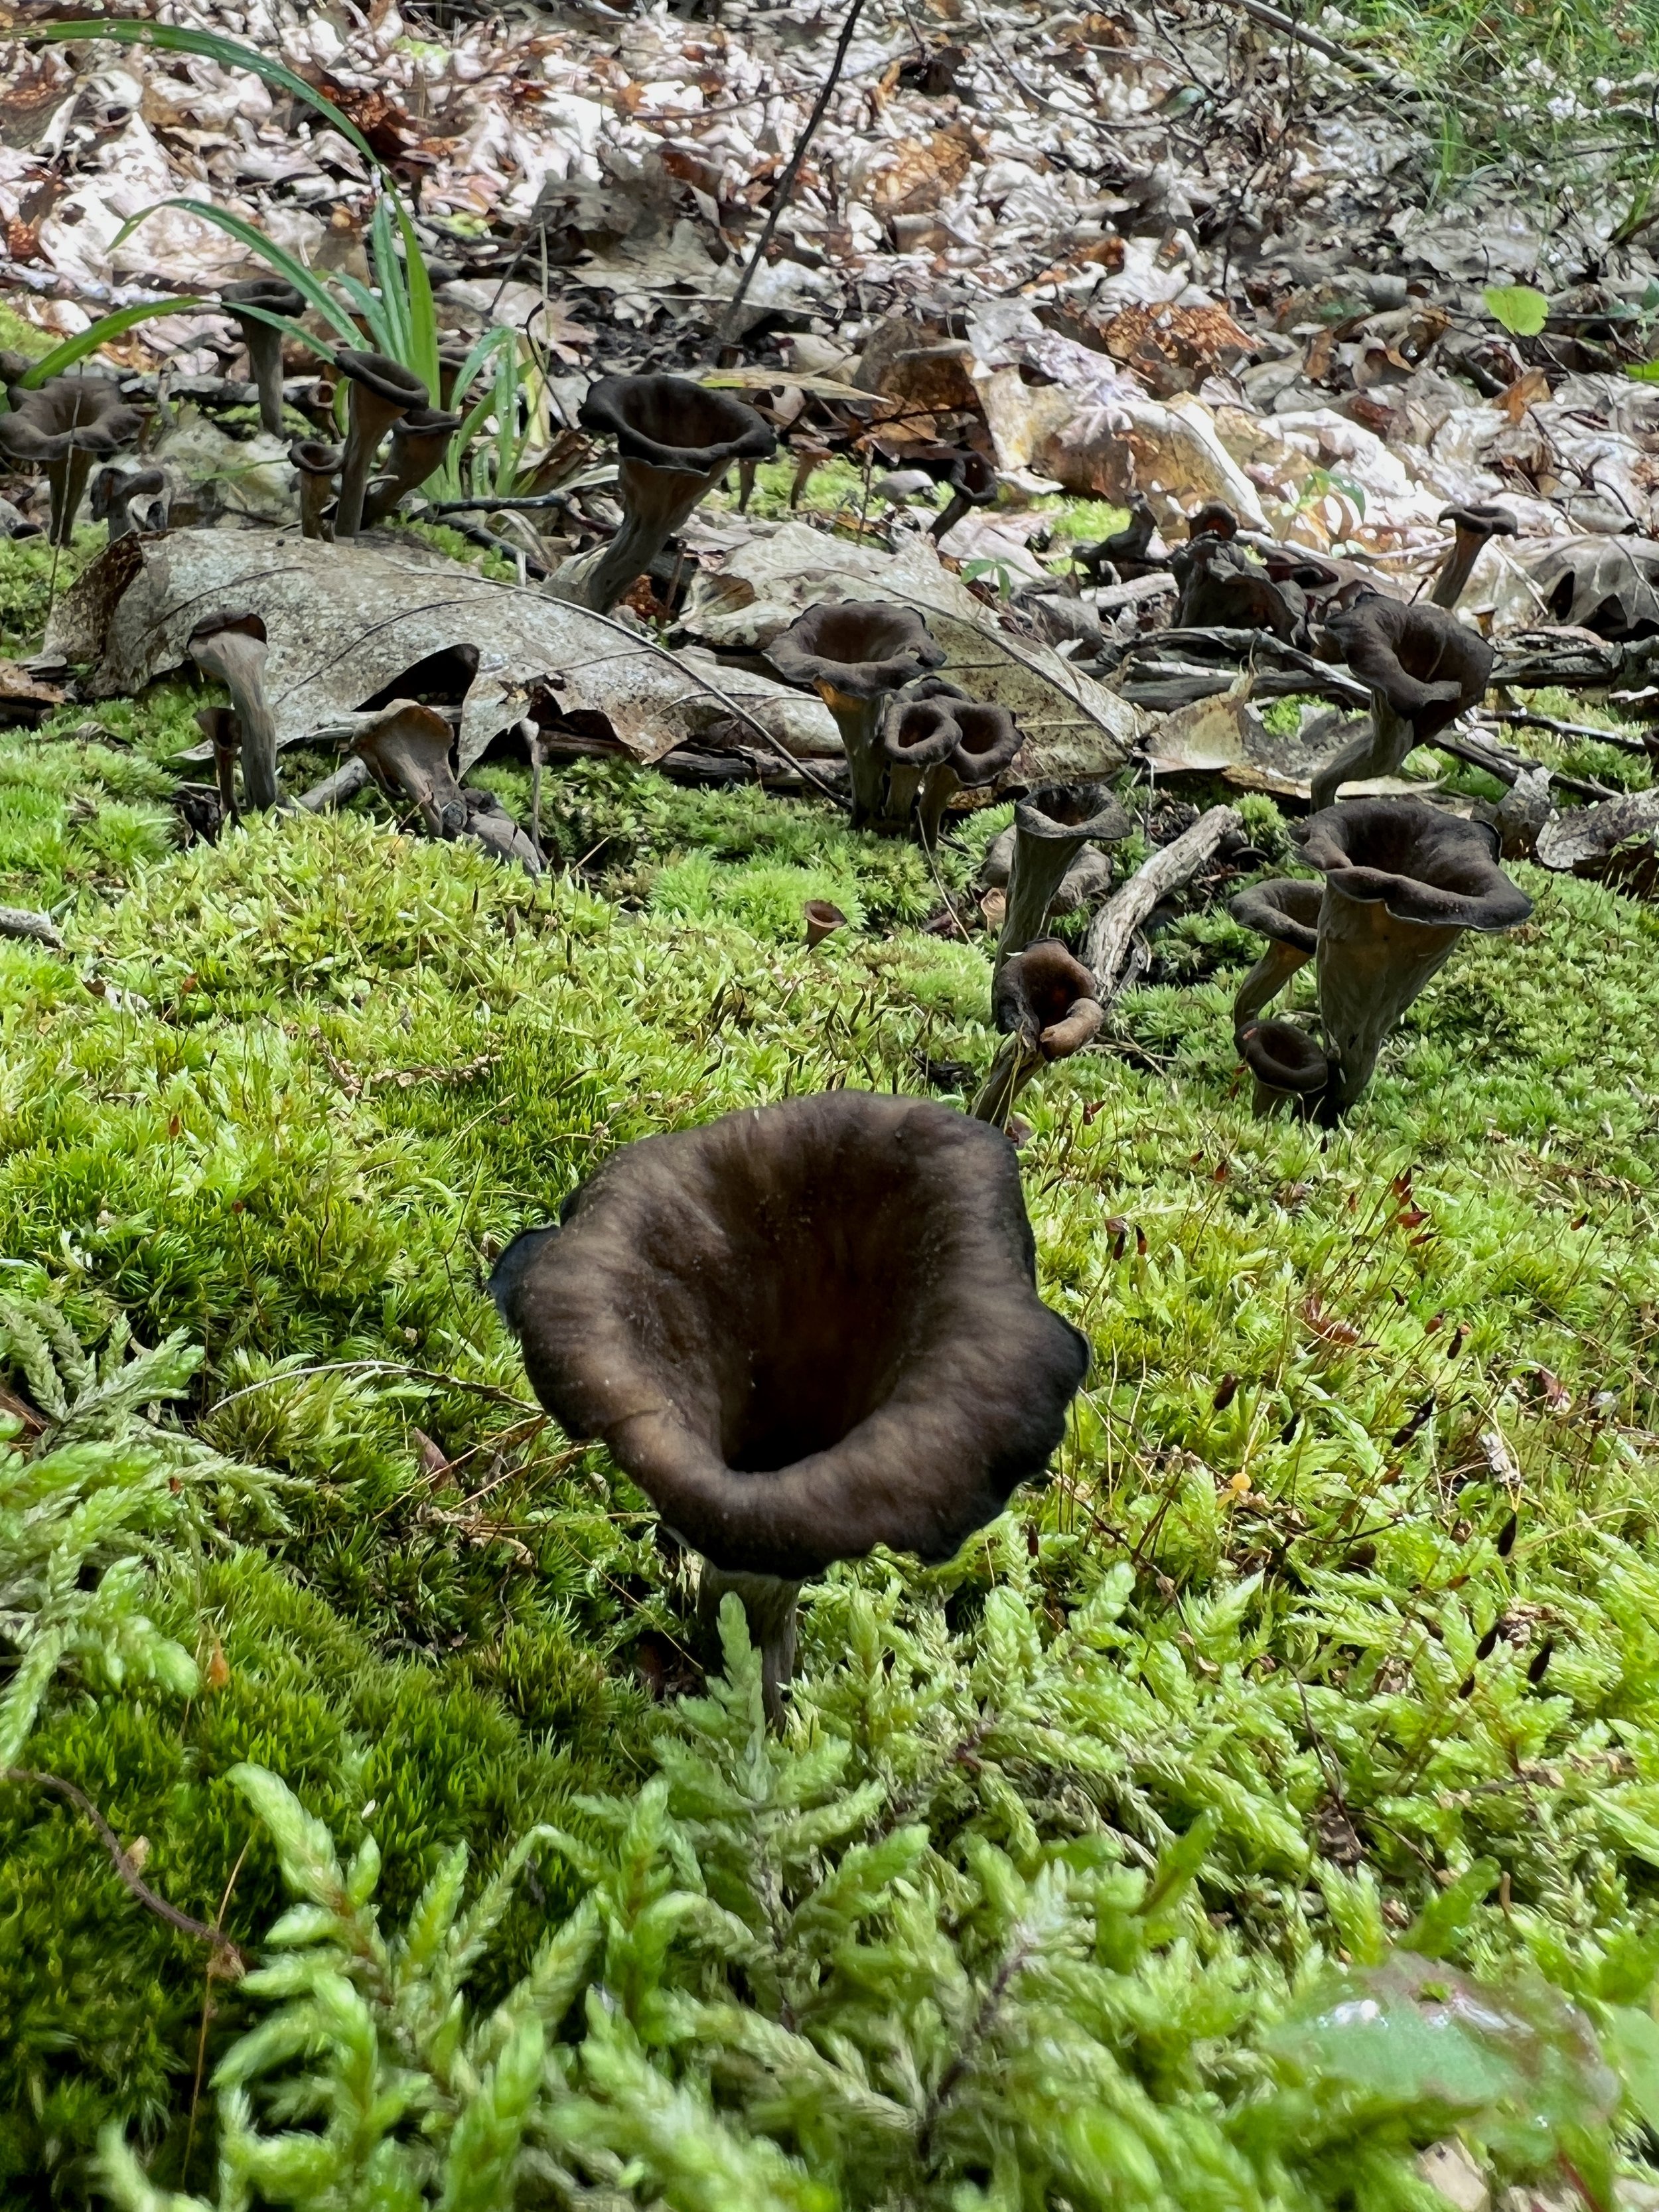
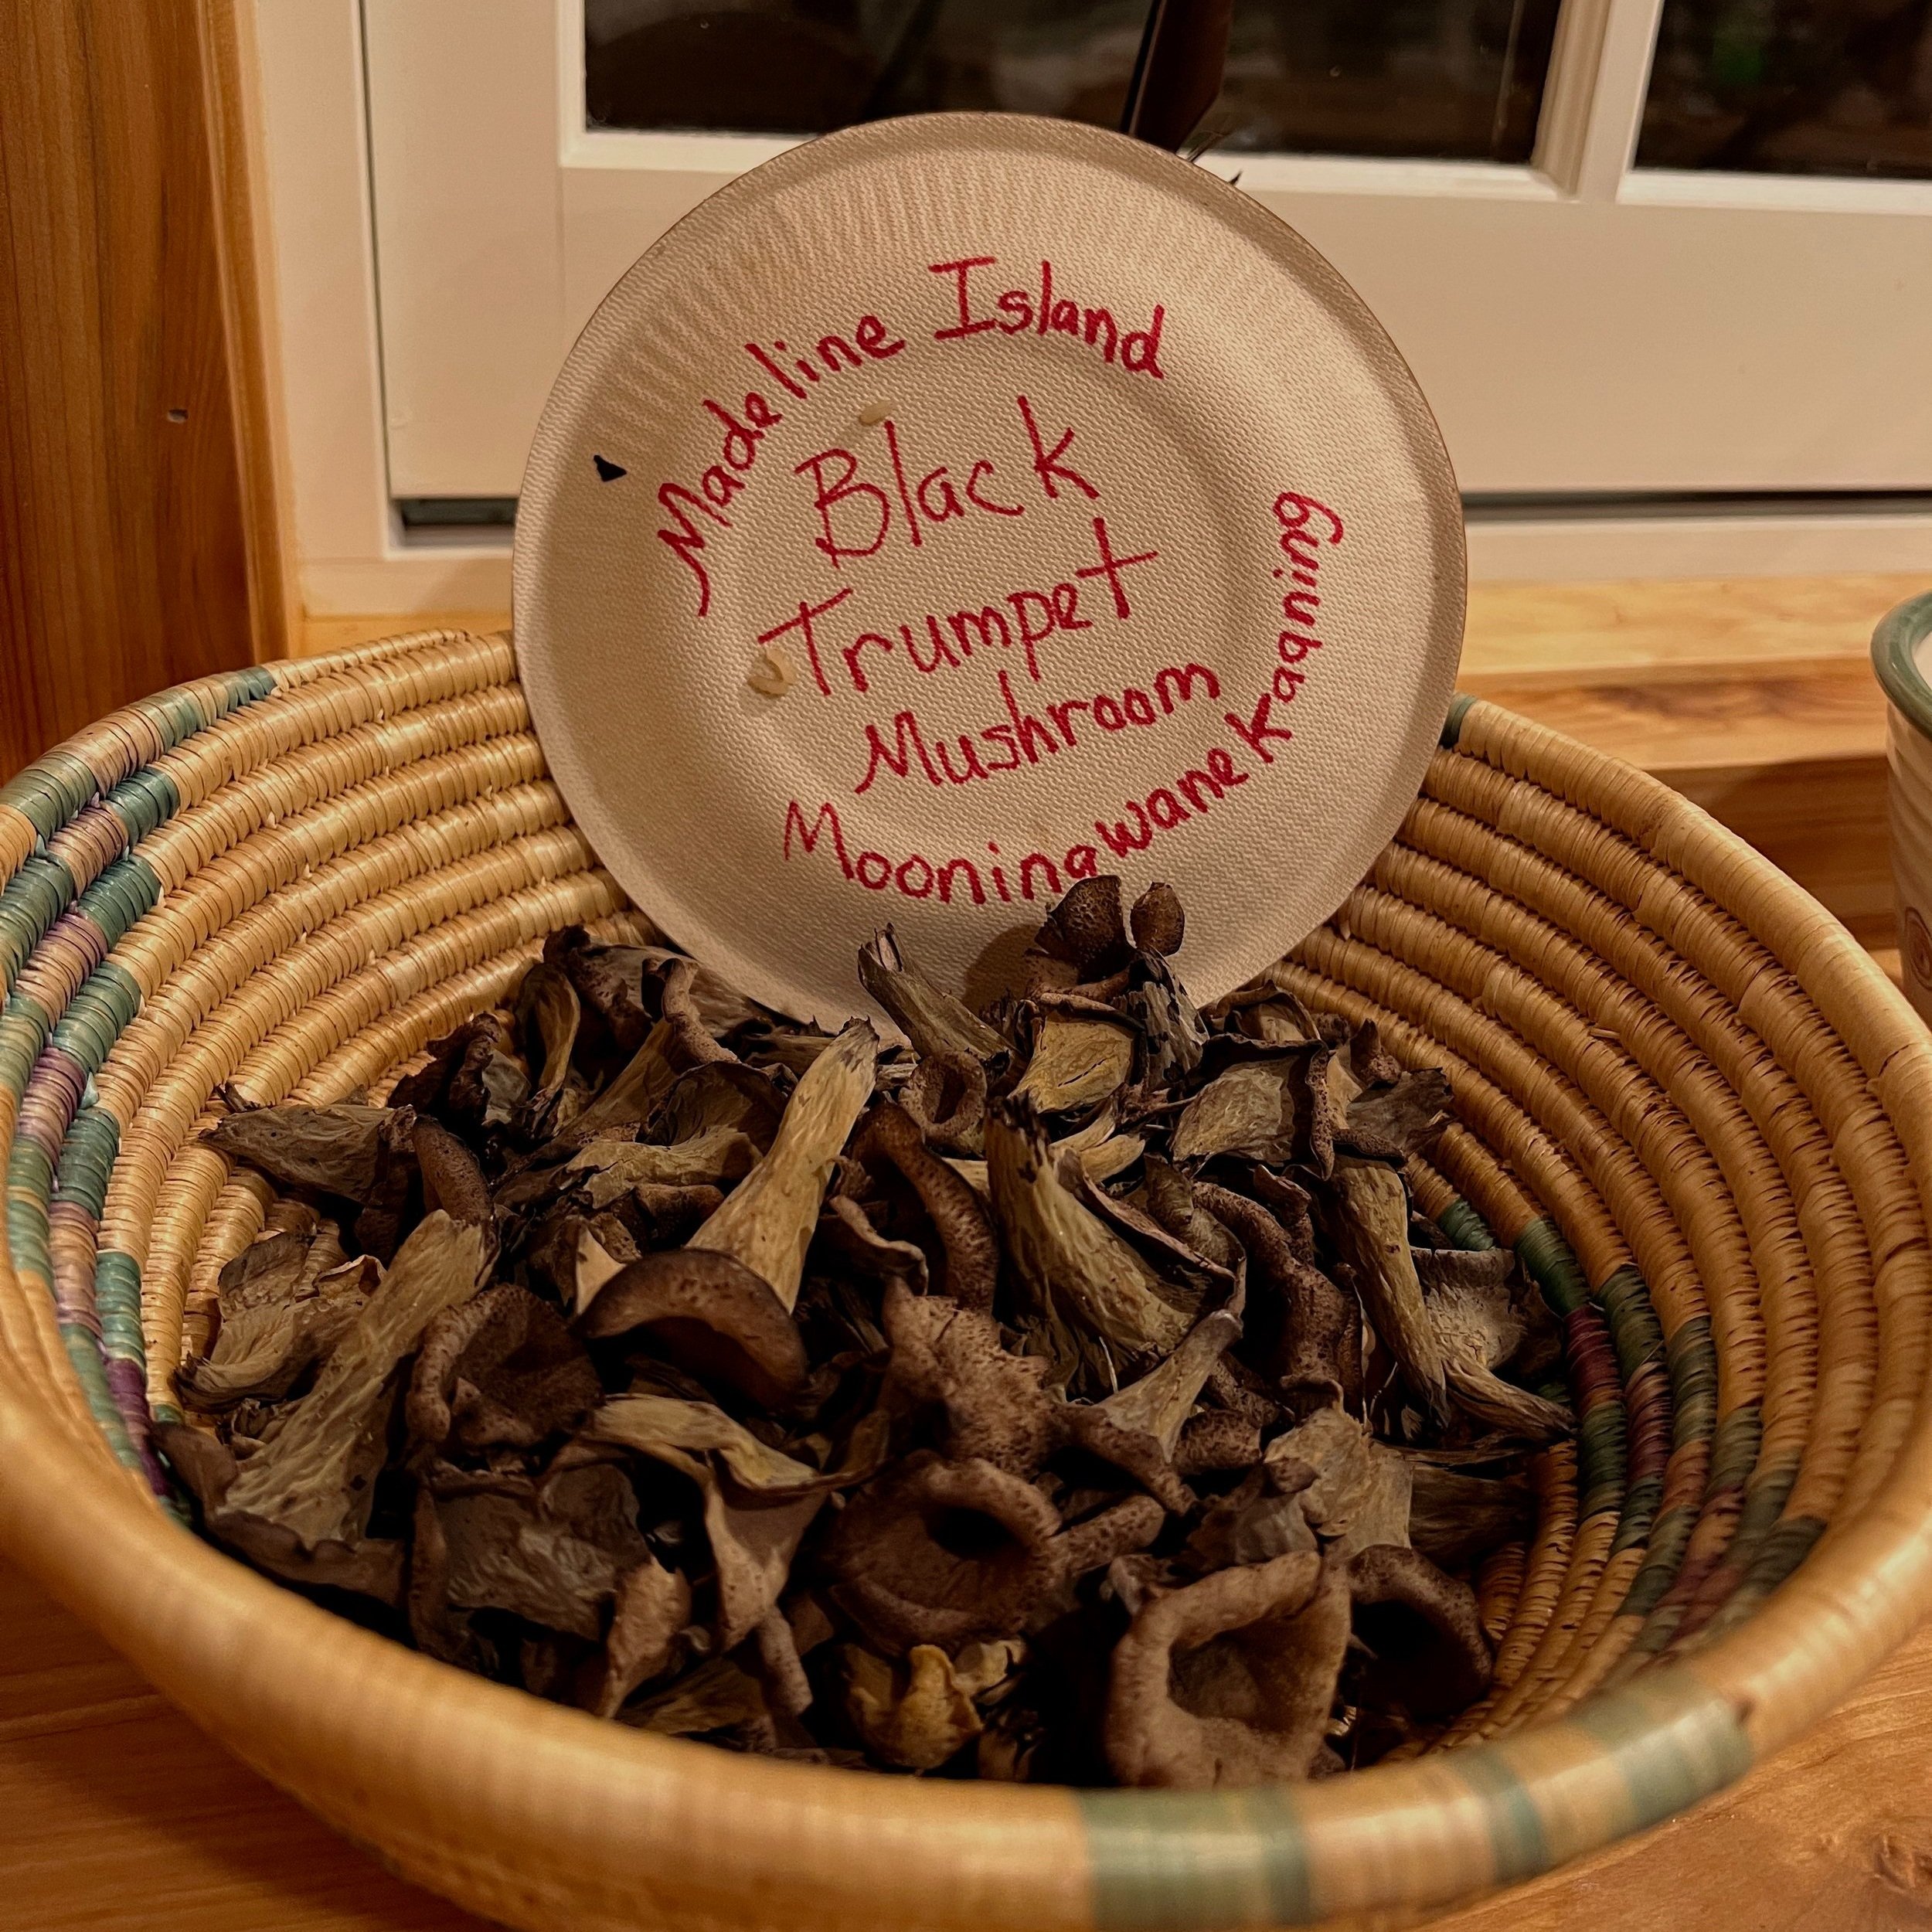
If there has been a scent to these recent late summer days, it’s the pine, oak and birch forests of Madeline Island, a mix of the Lake’s clarity and the forest’s earthy undergrowth. Kip and his wife Alli have been learning to forage the wild foods that grow abundant here, from chokeberries to nettles, and especially mushrooms – black trumpet, hedgehog, and soon (we hope) chicken of the woods.

Thanks to some forager friends willing to take them out on hikes, we’ve been feasting on the forest’s unrequited gifts. Knowing that many of these foods only grow wild, we cherish their unique flavors, each slightly different in its own woodsy way.
Mushrooms, unlike berries and greens, are often not easy to find. While raspberry canes droop over fences and sway wildly along the lakeshores almost begging to be picked, mushrooms do not proclaim themselves. They reveal themselves instead, only to those who slow down enough to gaze softly across heaps of dead leaves, peer behind logs, or sit on the forest floor and wait. Any forager knows that if you try too hard, you’ll come home with an empty basket.

Chanterelle mushrooms / Kip Dooley
Mushrooms, with their meaty texture and layers of umami, are just right for the heartier dishes we need at this moment in the year. Sautée them with wild rice, bake them into a quiche, or chop them fine and simmer them in butter before piling them onto toast.
And mushrooms are good not only for us (especially their antioxidants, which bolster the immune system), they also play a key role in the health of forests, breaking down debris into topsoil for new growth, while networks of their mycelia pass nutrients between trees.
Wild-foraged mushrooms do feel extra special – but if they’re not within reach, there are some fabulous local growers you can purchase from.
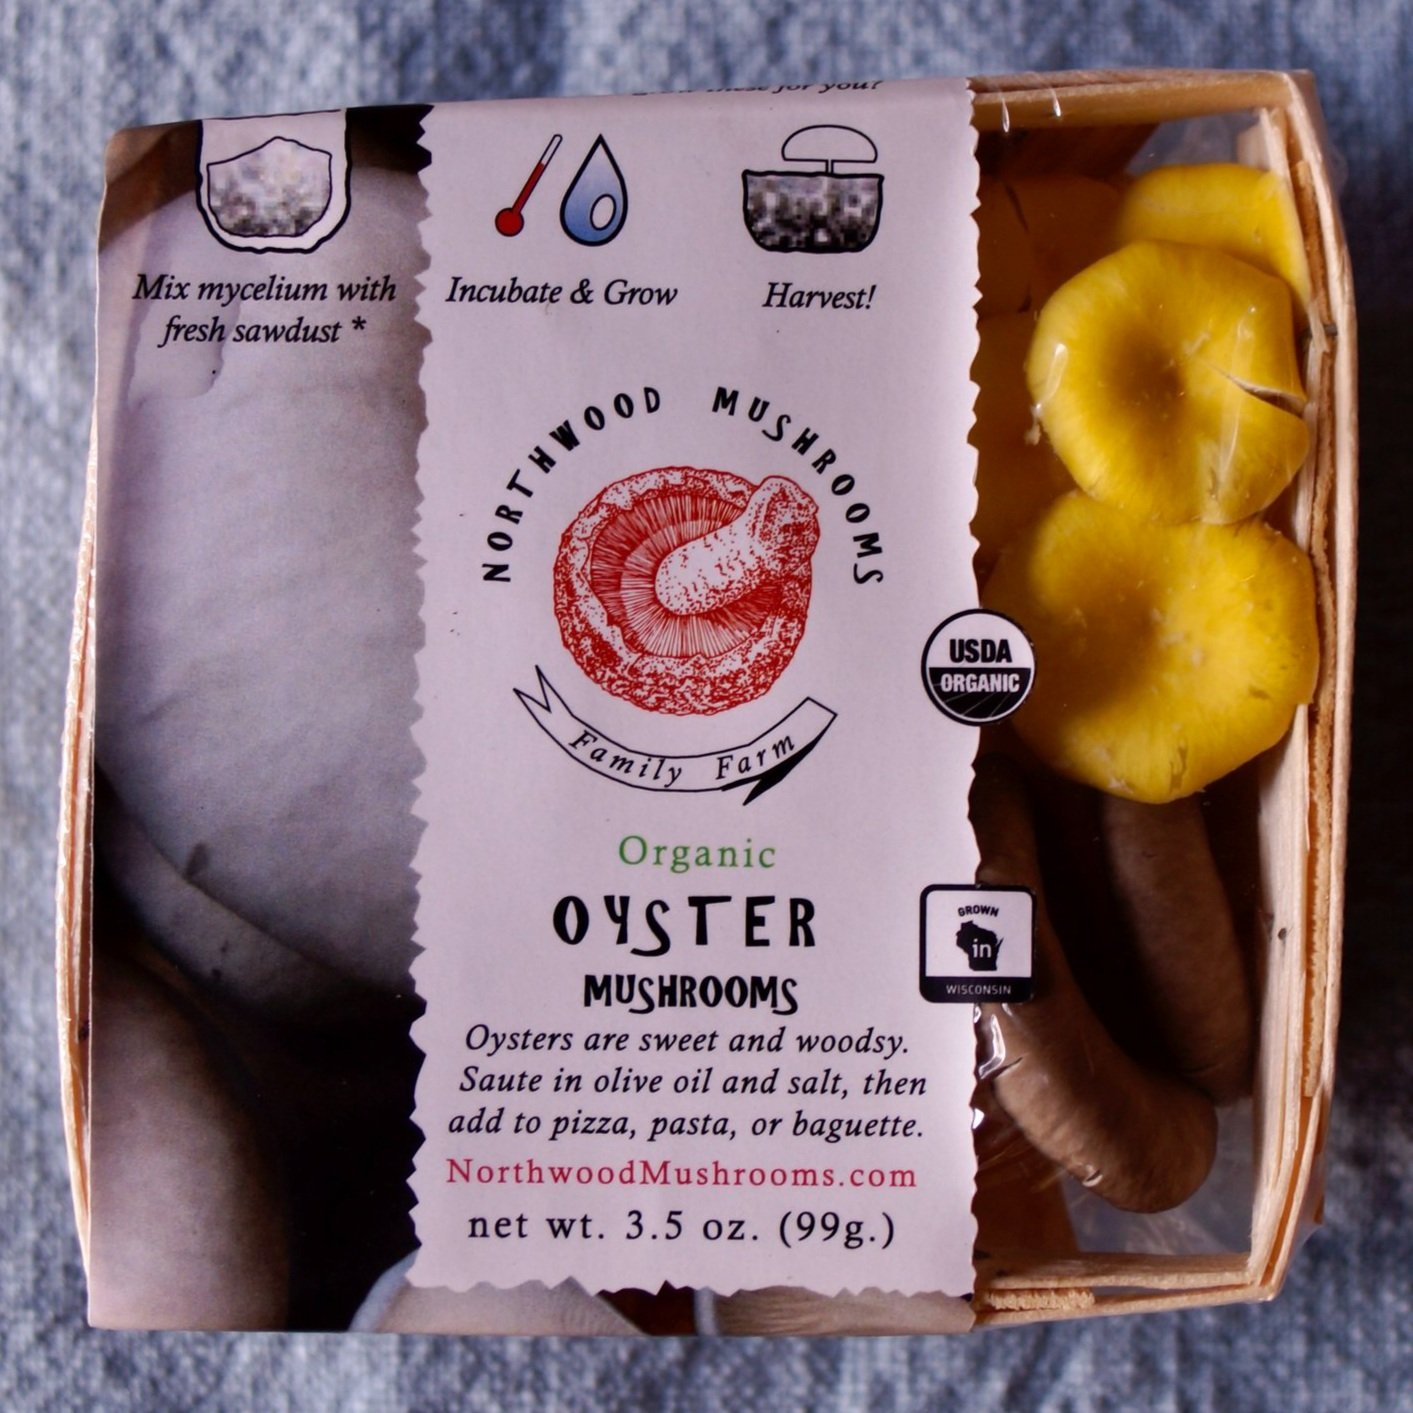
Try Northwoods Mushrooms (pictured left, from Clayton, Wisc.), Midwest Mushrooms (Twin Cities), Forest Mushrooms (St. Joseph, Minn.), or simply what's available at your local foods co-op.
Wild Mushroom Medley
Serves 4
Prep time: 5 minutes | Cook time: 30 minutes | Total: 35 minutes
Using a mix of different mushrooms gives you a lot of bang for your buck. This recipe relies on a mix of shiitake, hedgehog, and chanterelle.
Ingredients
1 cup dry wild rice
1/4 cup dried cranberries
Dash of maple syrup (optional)
2 lb. mixed cultivated fresh mushrooms (cremini, shiitake, oyster, etc.)
3 tbsp. unsalted butter, more as needed
1/4 c. finely chopped shallot
2 tsp. chopped fresh thyme
2 small cloves garlic, minced
1/4 c. dry white wine or splash of white or red vinegar
1/2 c. chicken or vegetable stock
Salt and freshly ground black pepper, to taste
Wild Rice: Set a pot with 1 cup water over high heat to boil, and add 1 tbsp sea salt. (Set aside 2 more cups water to add to the rice as it cooks). Rinse the rice with cold water in a mesh strainer, and add to the water once it's boiling. Allow the water to come to a boil again, then turn the heat down to simmer and cover.
Check the rice water levels every 5 minutes or so as you prepare and cook the mushrooms, slowly adding more water until the rice has opened up and the grain is soft, between 25 and 40 minutes depending on the variety.
When the rice is ready, add the dried cranberries, stir in and add salt and a dash of maple syrup to taste. Cover until serving.
Mushrooms: With a damp paper towel, wipe the mushrooms clean or quickly dunk in water and pat dry.
Heat a wide skillet over medium-high heat and add the butter, swirling the pan. When the butter begins to foam, toss in the shallots and mushrooms and cook, stirring until the mushrooms have released their juices and are lightly browned, about 8 to 10 minutes.
Remove the thyme leaves from their woody stems, chop fine with the garlic and stir in with the mushrooms to coat. Season well with the salt and pepper and continue to sauté for one more minute.
When the ingredients have browned slightly and are starting to stick to the pan, add the wine or vinegar and the stock, and continue cooking until the liquid has reduced by half, about 5 to 8 minutes. Taste and adjust the seasonings.
Serve atop the rice, garnish with a few more cranberries and full sprigs of thyme.
Onion Soup
Onion Soup (Soupe à l’Oignon Gratinée)
Serves about 4 to 6.
Note: This beautiful classic soup is built on the patient sautéing of onions so that they become golden, but do not burn. We like to serve the toasty cheese baguettes on the side to give more options — you can dunk them in the soup or pile them on top before digging in. From Beth Dooley.
• 2 tbsp. unsalted butter, plus more softened butter for Cheesy Toasts
• 1/4 c. chopped parsley
• 1 (2-in.) sprig fresh rosemary, plus more small sprigs for garnish
• 1 tsp. fresh thyme leaves or 1/2 tsp. dried
• 1 small bay leaf
• 1 1/2 lb. onions, mix of yellow and white, thinly sliced
• 2 large shallots, thinly sliced
• Salt and freshly ground black pepper to taste
• 6 c. beef or chicken stock
• Generous shot of Worcestershire sauce, to taste
• 1/3 c. sherry or cognac, or generous splash balsamic vinegar, to taste
• 12 (1-in.) thick baguette slices
• 1 garlic clove, halved crosswise
• 1 1/4 c. shredded Gruyère cheese
Directions
To make the soup: In a large, deep, heavy soup pot set over low heat, melt 2 tablespoons butter and add the parsley, rosemary, thyme, bay leaf, onions and shallots. Sprinkle generously with salt and pepper and stir to coat the onions. Cover and cook over low heat, stirring regularly, until the onions are very, very soft, sticky sweet and a deep golden color, about 30 to 45 minutes.
Then stir in the stock, increase the heat a little and bring to a simmer, skimming off any foam that rises to the top. Simmer, uncovered, until the stock has reduced by about 1/2 cup, about 20 to 30 minutes. Season with the Worcestershire and sherry, and serve garnished with small sprigs of rosemary if desired and the Cheesy Toasts on the side.
To make the Cheesy Toasts: Preheat the oven to 375 degrees. Spread both sides of the baguette slices with butter and place on a baking sheet. Bake, turning once, until golden, about 7 minutes per side. Remove and rub each slice on both sides with the cut side of the garlic clove. Arrange on the baking sheet and sprinkle evenly with the cheese.
Turn on the broiler and run the toasts under it until the cheese is bubbly; watch so it doesn’t burn, about 2 to 4 minutes.
Nutrition information per each of 6 servings:
Calories: 360
Fat: 20 g
Sodium: 490 mg
Carbohydrates: 31 g
Saturated fat: 12 g
Total sugars: 8 g
Protein: 15 g
Cholesterol: 55 mg
Dietary fiber: 3 g
Exchanges per serving: 2 starch, 1 high-fat protein, 2 fat.
How to build a better turkey burger
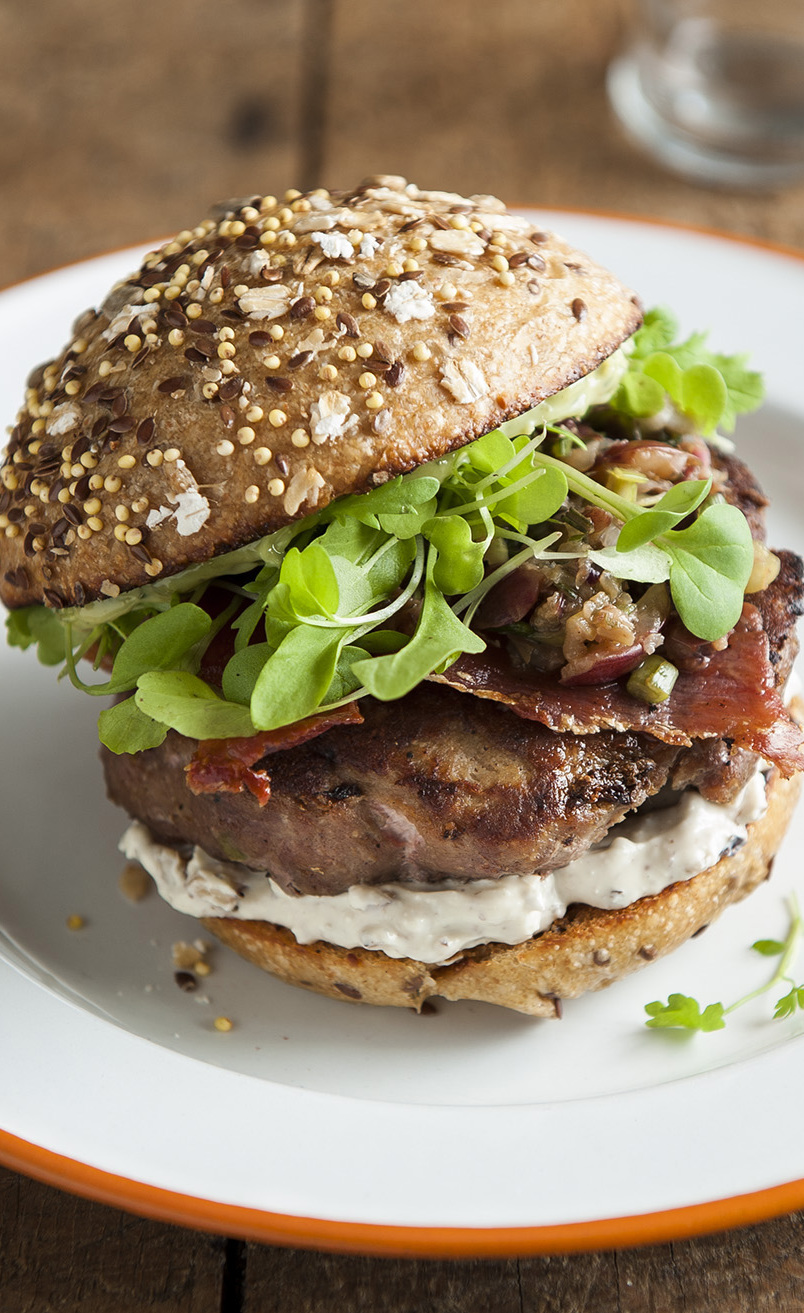
Photo by Mette Nielsen
Turkey burgers have a reputation for being virtuous, but that’s not why I like them. They are milder in taste than beef or lamb, with a softer texture, so they offer a neutral canvas for a range of seasonings and bold condiments. This is a burger where more is better, so pile it on.
Ground turkey is especially lean, and like all poultry, needs to be thoroughly cooked. Keeping turkey burgers from becoming dry can be tricky. Rule No. 1 is to pan-fry them rather than grilling them, good advice that applies to any ground meat patty (beef, lamb or turkey), which retains its moisture and is juicier when seared in a hot pan.
Use a heavy skillet or frying pan — seasoned cast iron works best. And for a turkey burger, start it over high heat to get a great dark crust, then turn the heat down, and cook the turkey slowly, thoroughly, until it’s no longer pink within. Dark meat ground turkey has more flavor and a little more fat than white-meat turkey, and makes a great choice. A mix of both will also work well.
Turkey meat needs seasonings. Soy, Worcestershire sauce or fish sauce add rich, dark notes of umami. While some cooks mix in eggs to bind and moisten the turkey, I find that a good mayonnaise does the same while enriching the meat with much needed fat.
Once you’ve cooked the burgers, it’s time for condiments and don’t hold back! I go for bold tasting cheeses, salty cured meats, sautéed mushrooms and fresh, snappy greens.
Just this past week at the farmers market, I stocked up on arugula, sorrel, mizuna, pea shoots and radish microgreens. Though delicate, these greens are so fresh they’ve lasted all through the week, ready to layer in sandwiches, pile on pizzas, garnish frittatas and add spicy crunch to burgers, as well as chicken, potato and noodle salads.
The best bet for buns? The humble whole-wheat burger bun, lightly toasted, is sturdy enough to stand up to an array of necessary and deliciously messy condiments. Get out the napkins, as this better burger requires two hands.

Maple syrup announces spring
The first signs of spring are very sweet, literally. It’s maple syrup season and I’m just back from a friend’s sugar bush near Lake Superior where we tapped trees in the deep, quiet, snowy woods.
At this time of year, you get a whiff of maple on the bright, damp spring air as the sap simmers into syrup. A group of us gathered to help schlep buckets of sap, collected from taps under the tress, to the huge pot set over a fire. We took turns stirring, while sipping maple-spiked coffee, cocoa and whiskey, stamping our feet to stay warm.
Maple is North America’s most reliable indigenous sweetener. Sap is clear, mildly sweet, and runs when the day’s temperatures rise above freezing and then drop back down at night. The season begins in March and, most years, continues for about a month. Given our winter, this promises to be a very good year.
It takes about 40 years for a tree to mature and produce sap, and about 45 gallons of sap to produce a gallon of syrup.
The process of reducing the liquid to a thick, glossy syrup is simple. The first run of sap boils down to be relatively light and clear before the rush of starches have begun pulsing through the tree. As the season progresses, the syrup becomes darker, until the last run is as dark as wet tree bark.
Maple syrup, once opened, is best kept in the refrigerator or it may turn moldy. Glass containers maintain the pure taste better than do plastic and metal. If mold develops, strain it out, bring the syrup to a boil in a saucepan, then cool and refrigerate.
Several years ago, the U.S. Department of Agriculture adapted a grading system that relates to color and taste:
Golden: Light and translucent, this syrup is delicate and subtle. Save this for fluffy waffles, crêpes, vanilla ice cream, foods that don’t compete with its pure favor.
Amber: This is the familiar maple syrup, sturdy and predictable. It’s the syrup for hearty pancakes and bacon, bourbon cocktails and glazes. Its flavor comes through, but does not overwhelm.
Dark: This is the strong stuff, perfect for a barbecue sauce, New England baked beans, and to brush on a slow roasting duck or pork shoulder roast. It makes a wonderful alternative to molasses in ginger cookies and breads.
Butter Roasted Leeks

Butter Roasted Leeks photo by Mette Nielsen
Butter Roasted Leeks
Serves 4 to 6
Pair these with roast chicken or toss with pasta, fold into an omelet or strew on pizza.
4 medium leeks, trimmed, sliced in half
¼ cup vegetable or chicken stock
2 tablespoons fresh lemon juice
2 to 3 tablespoons unsalted butter, melted
Salt and freshly ground black pepper
Preheat the oven to 400 degrees F. Run the leeks under cold water to remove any dirt or grit. Pat dry with a clean dishtowel. Place the leeks in a baking dish, add the stock and lemon juice. Drizzle with the butter, season with salt and pepper. Cover the dish with aluminum foil. Bake the leeks until fork tender, about 30 minutes. Remove the foil and continue roasting the leeks until the color begins to darken, about 10 to 15 minutes more.
Hot & Tangy Strawberry Jam

Hot & Tangy Strawberry Jam photo by Mette Nielsen
Hot & Tangy Strawberry Jam
Makes about 2 half pints
2 pints strawberries cut into smaller pieces, about 5 cups
¾ cup sugar
3 tablespoons fresh grapefruit juice (red grapefruit preferred)
1 tablespoon finely grated grapefruit zest
½ teaspoon cayenne pepper, optional
Combine all of the ingredients into a 10-inch sauté pan. Set it over medium heat and bring to a gentle boil. Reduce the heat an simmer, stirring occasionally until the jam begins to thicken, about 12 to 15 minutes.
Remove the pan from the heat and spoon into clean jars, leaving a half inch f head room to allow for expansion. Wipe the rims with a clean wet cloth or paper towel, add the lids and bands, and finger tighten the bands. Once cooled, store in the refrigerator or freeze.
Cauliflower Roasted!
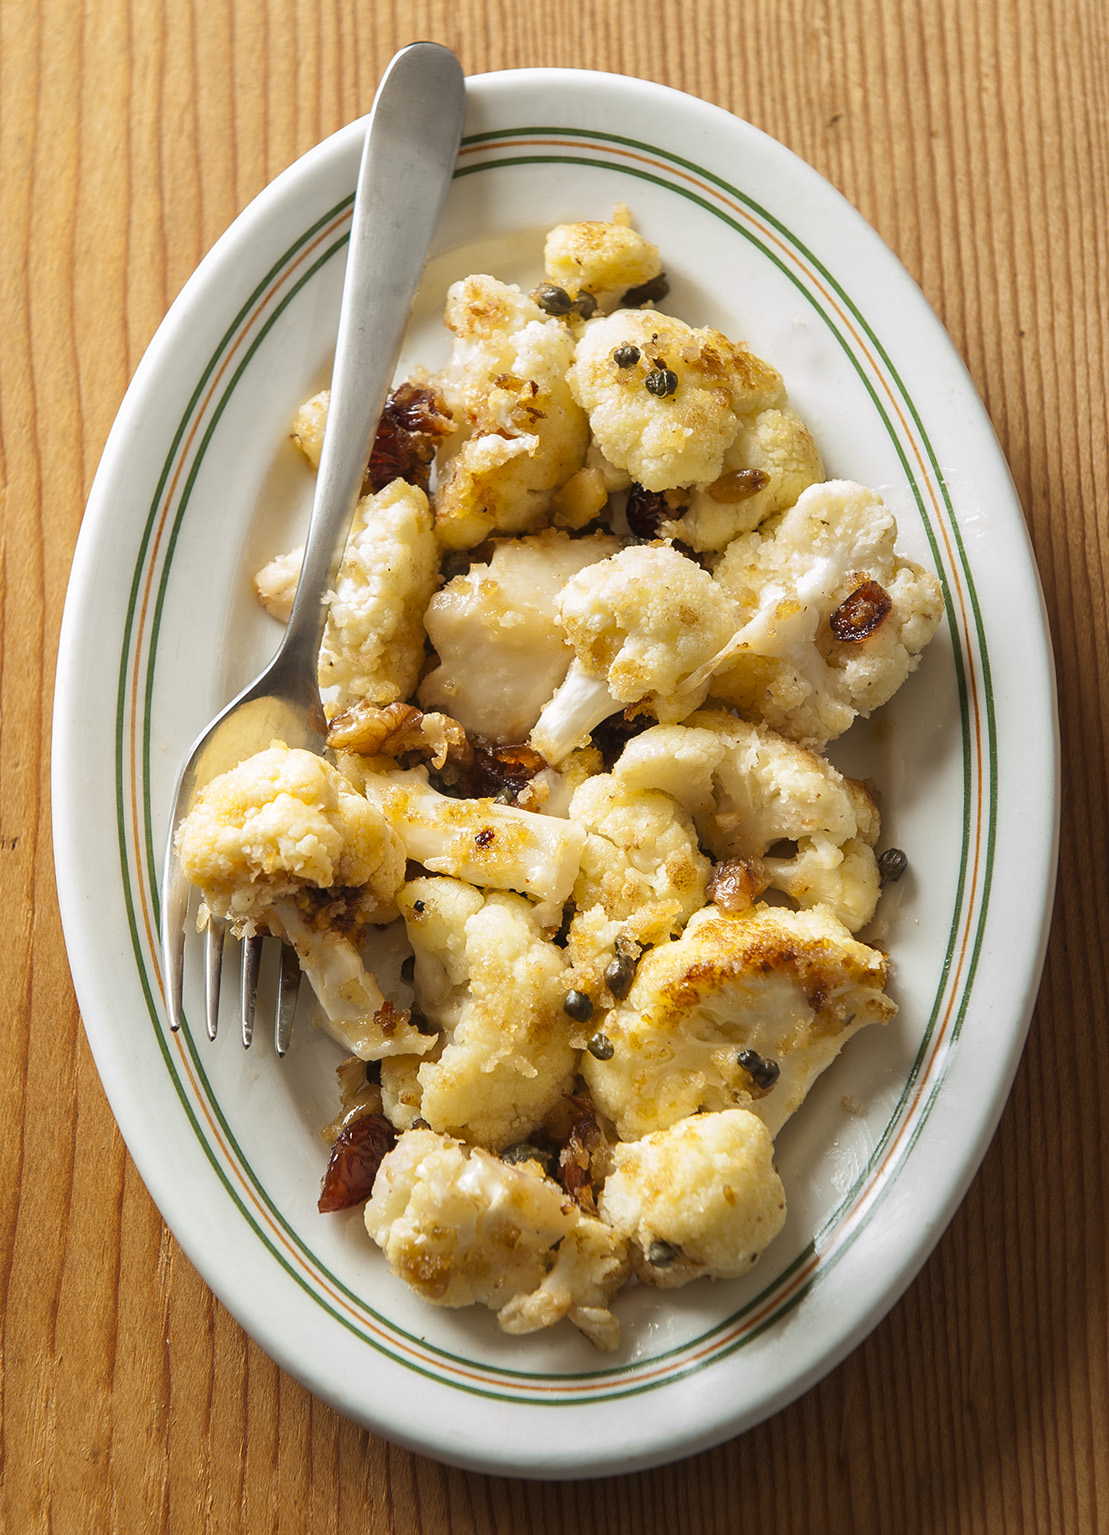
Pan Roasted Cauliflower photo by Mette Nielsen
Pan Roasted Cauliflower with Garlic, Capers, and Walnuts
Serves 4 to 6
Golden, roasted cauliflower, tossed with salty capers and tangy-sweet craisins, makes a winning side dish or small plate. Toss this with pasta and a little sharp cheese for an easy, light meal.
This method of pan roasting works equally well for any member of the cabbage family (broccoli, Brussels sprouts, etc). Just be sure the vegetable is cut into equal sized pieces before you begin for even cooking..
2 tablespoons extra virgin olive oil
2 heads cauliflower, broken into florets
2 cloves garlic, smashed
1 tablespoon lemon juice, or more to taste
2 tablespoons capers, drained
¼ cup craisins
2 tablespoons chopped toasted walnuts
Salt and freshly ground black pepper to taste
In a large skillet, heat the oil over high and sauté the cauliflower and garlic, tossing until it is nicely coated. Reduce the heat slightly, cover the pan, and cook until just tender, about 5 minutes. Uncover and continue cooking, tossing, until the cauliflower is nicely browned, another 3 to 5 minutes. Toss in the lemon juice, capers, craisins, and walnuts and season with salt and pepper to taste. Serve warm or at room temperature.
Pan Roasted Pears with Shallots and Crumbled Blue Cheese

Pear Chutney photo by Mette Nielsen
Serves 4 to 6 (easily expanded)
Roasting pears takes them a step further into their “pearness”. That quick blast of heat caramelizes their natural sugars so they become darker and more robust. Roasted pears will keep in the refrigerator in a covered container for at least three days.
Try this combination alongside roast pork or chicken, or serve on dark greens and drizzle with a light vinaigrette. Omit the shallots, they’re great served for dessert spooned over vanilla ice cream or on top of pound cake.
2 tablespoons extra virgin olive oil
1 medium shallot, peeled and diced
3 to 4 pears, cored and cut into ½-inch slices
4 ounces blue cheese, crumbled
4 to 6 slices bruschetta*
Freshly ground black pepper to taste
Film a medium-sized skillet with the oil and set over medium-high heat. Add the shallots and cook until they’re just translucent, about 3 minutes, remove to a plate and set aside. Add the pears and cook until they just begin to color and turn them carefully with a spatula, about 3 to 5 minutes per side.
Set 4 to 6 slices of bruschetta on a plate and layer on the shallots and pears, then top with the crumbled blue cheese. Serve warm or at room temperature. Garnish with the cracked black pepper.
*To make the bruschetta: Preheat the oven to 400 degrees F. Set 4 to 6 slices of baguette on a baking sheet and brush lightly with extra virgin olive oil. Bake until the bread is nicely browned, about 5 minutes. Remove.
Butternut Bisque

Serves 18 to 24 shot glasses or small cups.
Note: This is a colorful respite in the cold winter months, with velvety texture and balanced flavors. From “Chowgirls Killer Party Food: Righteous Bites & Cocktails for Every Season,” by Heidi Andermack and Amy Lynn Brown.
• 2 lb. butternut squash, peeled and cubed
• 1 tbsp. olive oil
• 5 tbsp. unsalted butter
• 2 1/2 c. chopped yellow onions
• 4 garlic cloves, minced
• 1/2 c. white wine
• 2 tbsp. champagne vinegar
• 4 c. vegetable broth
• 1 to 3 tbsp. kosher salt, to taste
• 3/4 c. heavy cream
“Dishing Up Minnesota: 150 Recipes From the Land of 10,000 Lakes,” by Teresa Marrone.
• 2 tbsp. sherry vinegar
• Salt taste
• 3 tbsp. salted butter
• 3 tbsp. pistachios, chopped, for garnish
Directions
Preheat the oven to 350 degrees and line a baking sheet with parchment paper.
In a large bowl, drizzle the squash pieces with olive oil and toss to coat.
Spread the squash pieces in a single layer on parchment-lined baking sheet and roast, turning once, for 1 hour or until the pieces are softened and browned at the edges.
Meanwhile, in a medium stock pot set over medium heat, melt the butter. Add the onions and sauté on low heat for 10 minutes, until they have sweated down and moisture has evaporated from the pan. Increase the heat to medium-high, stir the onions frequently and scrape up the caramelization from the bottom of the pan.
Once the onions are medium brown, add the garlic and sauté for 2 minutes, stirring frequently. Increase the heat to high and deglaze the pan with white wine and champagne vinegar. Continue to cool for about 5 minutes to reduce the liquid.
After the wine and vinegar have almost completely evaporated from the pan, add the roasted squash, broth, salt and cream. Cook on medium-low heat for 10 to 15 minutes or until the squash starts to break down. Transfer the soup to a blender, and blend high until the soup appears creamy and smooth. (Be careful when blending hot liquids!) Press the soup through a strainer. Add the sherry vinegar and salt to taste.
In a small saucepan set on medium heat, melt the 3 tablespoons of butter and cook for 1 to 2 minutes, until the solids start to brown. Keep warm.
Pour the soup into shot glasses. Top each with ½ teaspoon browned butter and ¼ teaspoon pistachios.
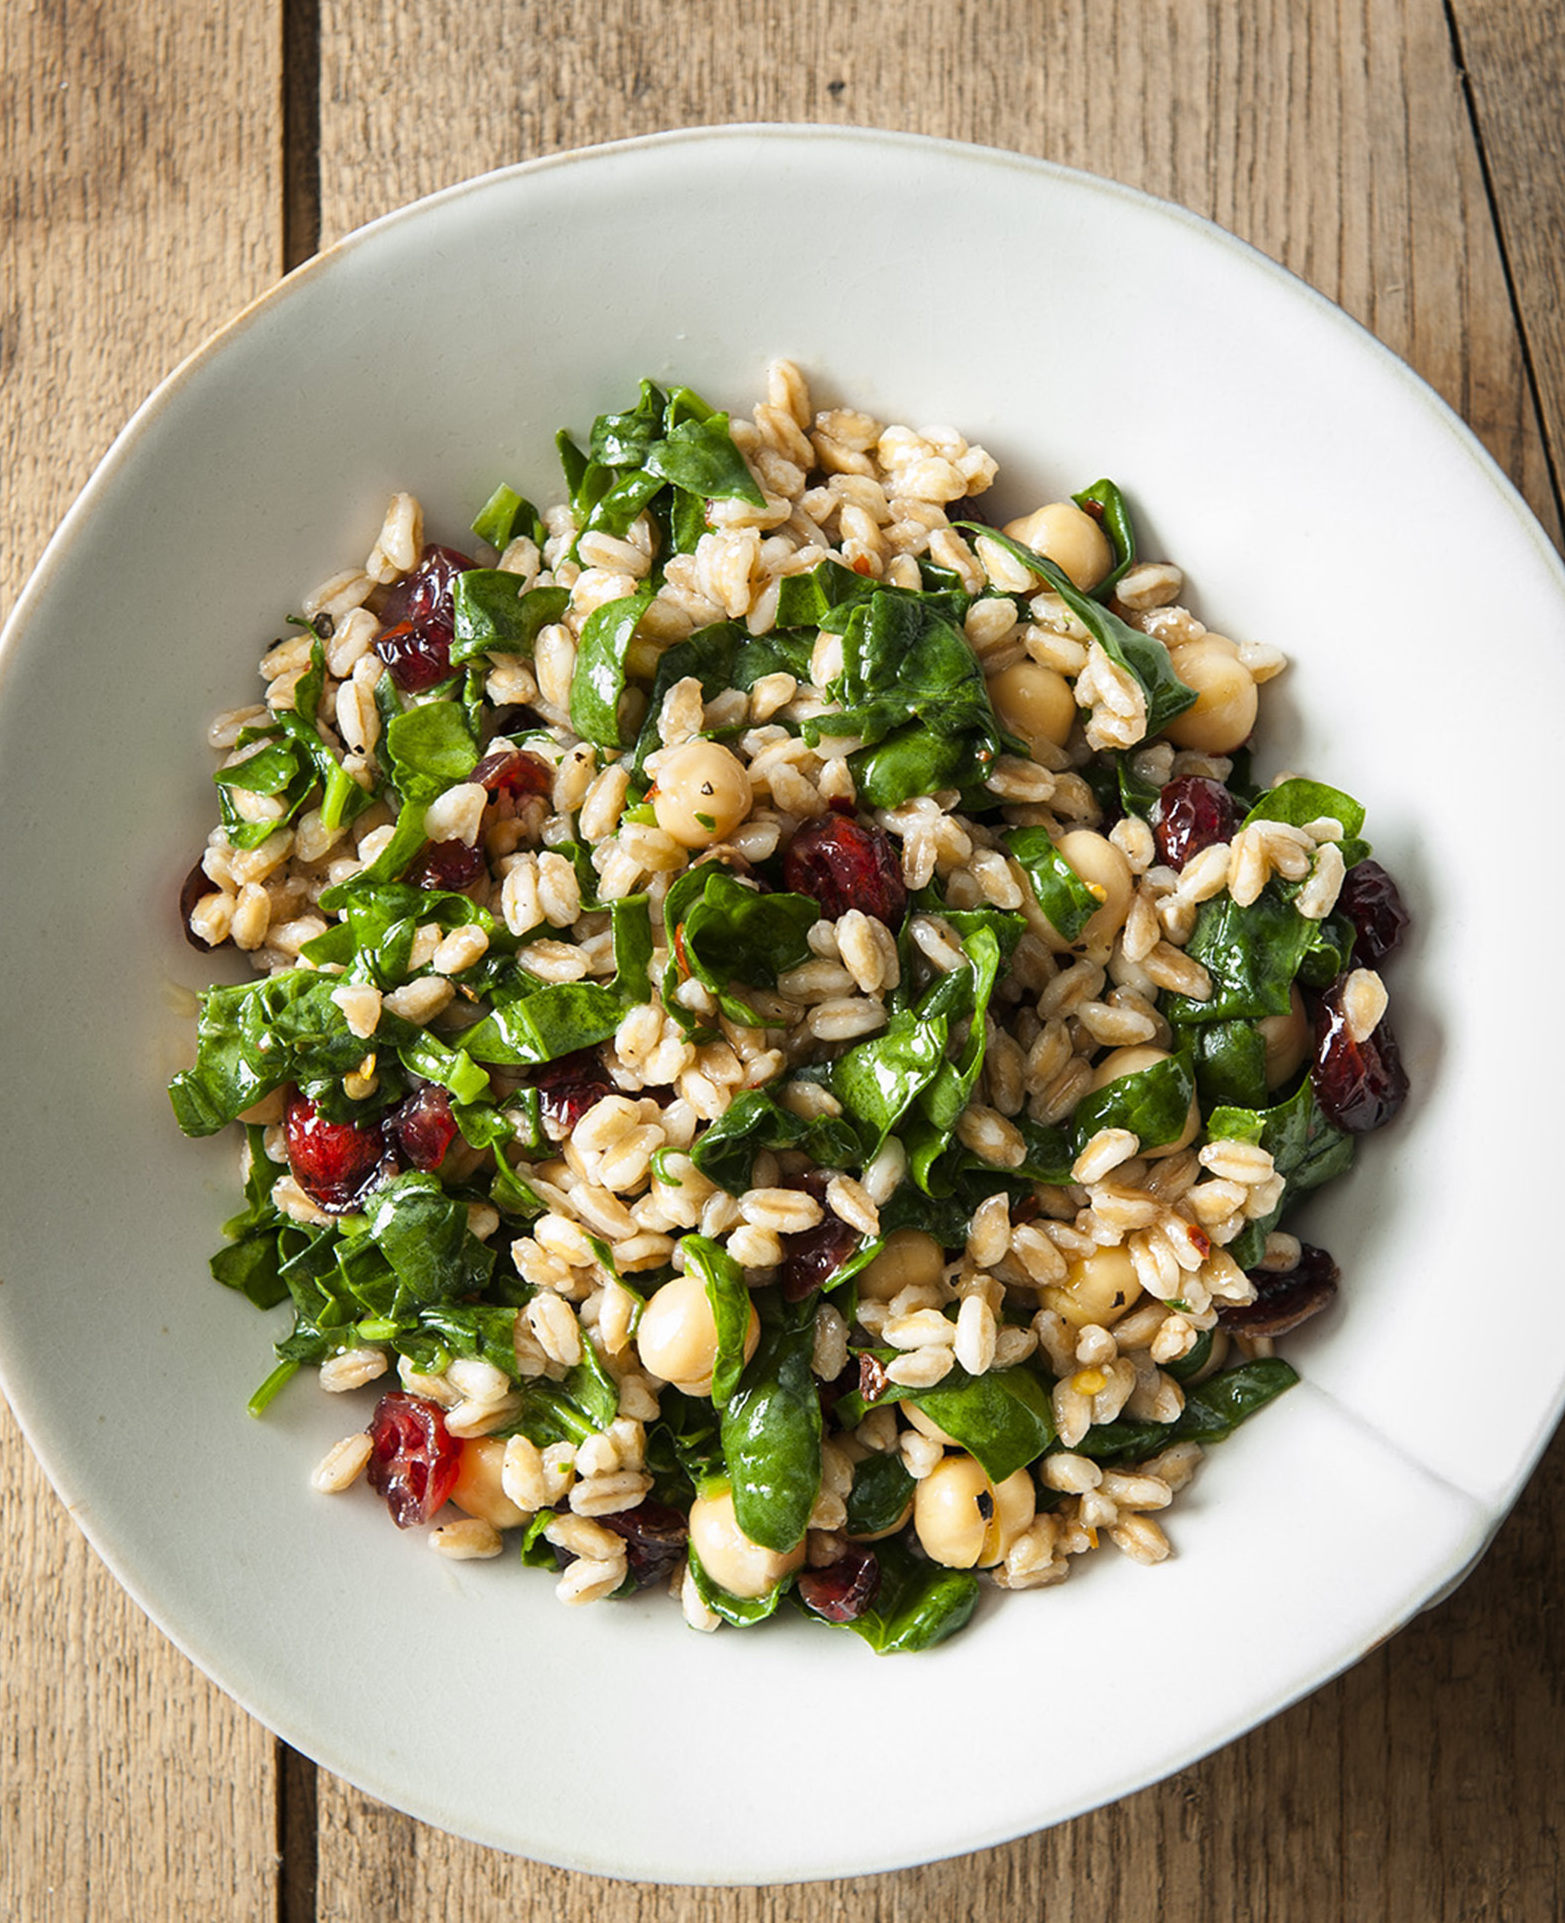
Chickpea and Farro Salad
Be prepared for mealtime with chickpeas in the pantry
Get your pantry in order with this reliable standard for meals that rely on what you have in the kitchen.
Mette Neilsen
Chickpeas have a lot of names: garbanzos, Egyptian peas, chana dal, Bengal gram.
I call dry chickpeas my go-to winter staple.
While there are plenty of good canned chickpeas available in the grocery aisles (the organic brands are especially good), the truth is that chickpeas are so much better when cooked from scratch. Sure, they take longer to soak and simmer than other types of dried beans, but they are well worth the effort. (Technically, chickpeas are neither beans nor peas; they are legumes.) A benefit: When you cook chickpeas from scratch, you end up with a wonderful viscous broth that’s good in soups, stews and sauces.
Chickpeas are firm, creamy and satisfying, and they make a fine main dish salad, stew, soup and pasta. Freshly made hummus is the best reason to keep chickpeas on hand. The store-bought stuff in a plastic tub can’t compare to this traditional spread. When puréed with extra-virgin olive oil, lots of garlic, fresh lemon and a pinch of sumac, hummus is one of the easiest party foods to wow guests.
Chickpeas and whole grains are natural partners, especially in wintry dishes that are hearty but healthful. Farro, a nutty tasting, slightly chewy and relatively quick-cooking cousin of wheat, works especially well in a main-dish salad with tart cranberries or chopped apricots, and dark greens. Toss these with a bright lemon-spiked vinaigrette and the earthy flavors open up. Most grain and bean salads can be made ahead, held in the refrigerator for a day or two, so the flavors marry. They’re perfect for potlucks and holiday parties. Leftovers make a wonderful lunch.
It’s best to soak chickpeas before cooking. This saves an enormous amount of time on the stove and makes them far more digestible. Soaking them in plenty of water to cover for at least four hours or overnight does the trick. (Here’s where a pressure cooker can be mighty useful.)
Some cookbooks insist that the chickpea skins be removed, but this seems like too much. When my cupboard is stocked with chickpeas, whole grains, dried fruit, good oil, garlic and spices, I’ve got all I need for a sumptuous meal on those bitter cold nights when I’d rather not have to go out.
Chickpea and Farro Salad
Serves 4.
Note: This makes a nice light main course salad; add sliced chicken or turkey for a heartier meal. It will keep at least two days in the refrigerator so feel free to make it ahead. It travels well. From Beth Dooley.
• 2 c. cooked farro (see below)
• 2 c. cooked chickpeas (see below)
• 1 c. chopped kale
• 1/4 c. dried cranberries
• 3 tbsp. fresh lemon juice
• 1/4 c. extra-virgin olive oil
• Generous pinch red pepper flakes
• 1/4 c. chopped fresh parsley
• Salt and freshly ground black pepper to taste
Directions
Place the farro, chickpeas, kale and cranberries into a large bowl.
In a separate small bowl, whisk together the lemon juice, olive oil and red pepper flakes.
Add the parsley, salt and pepper to the chickpeas and farro, and toss all with the vinaigrette.
Roasting brings out cauliflower's sweetness, heartiness
Versatile vegetable makes great side dish or entree.
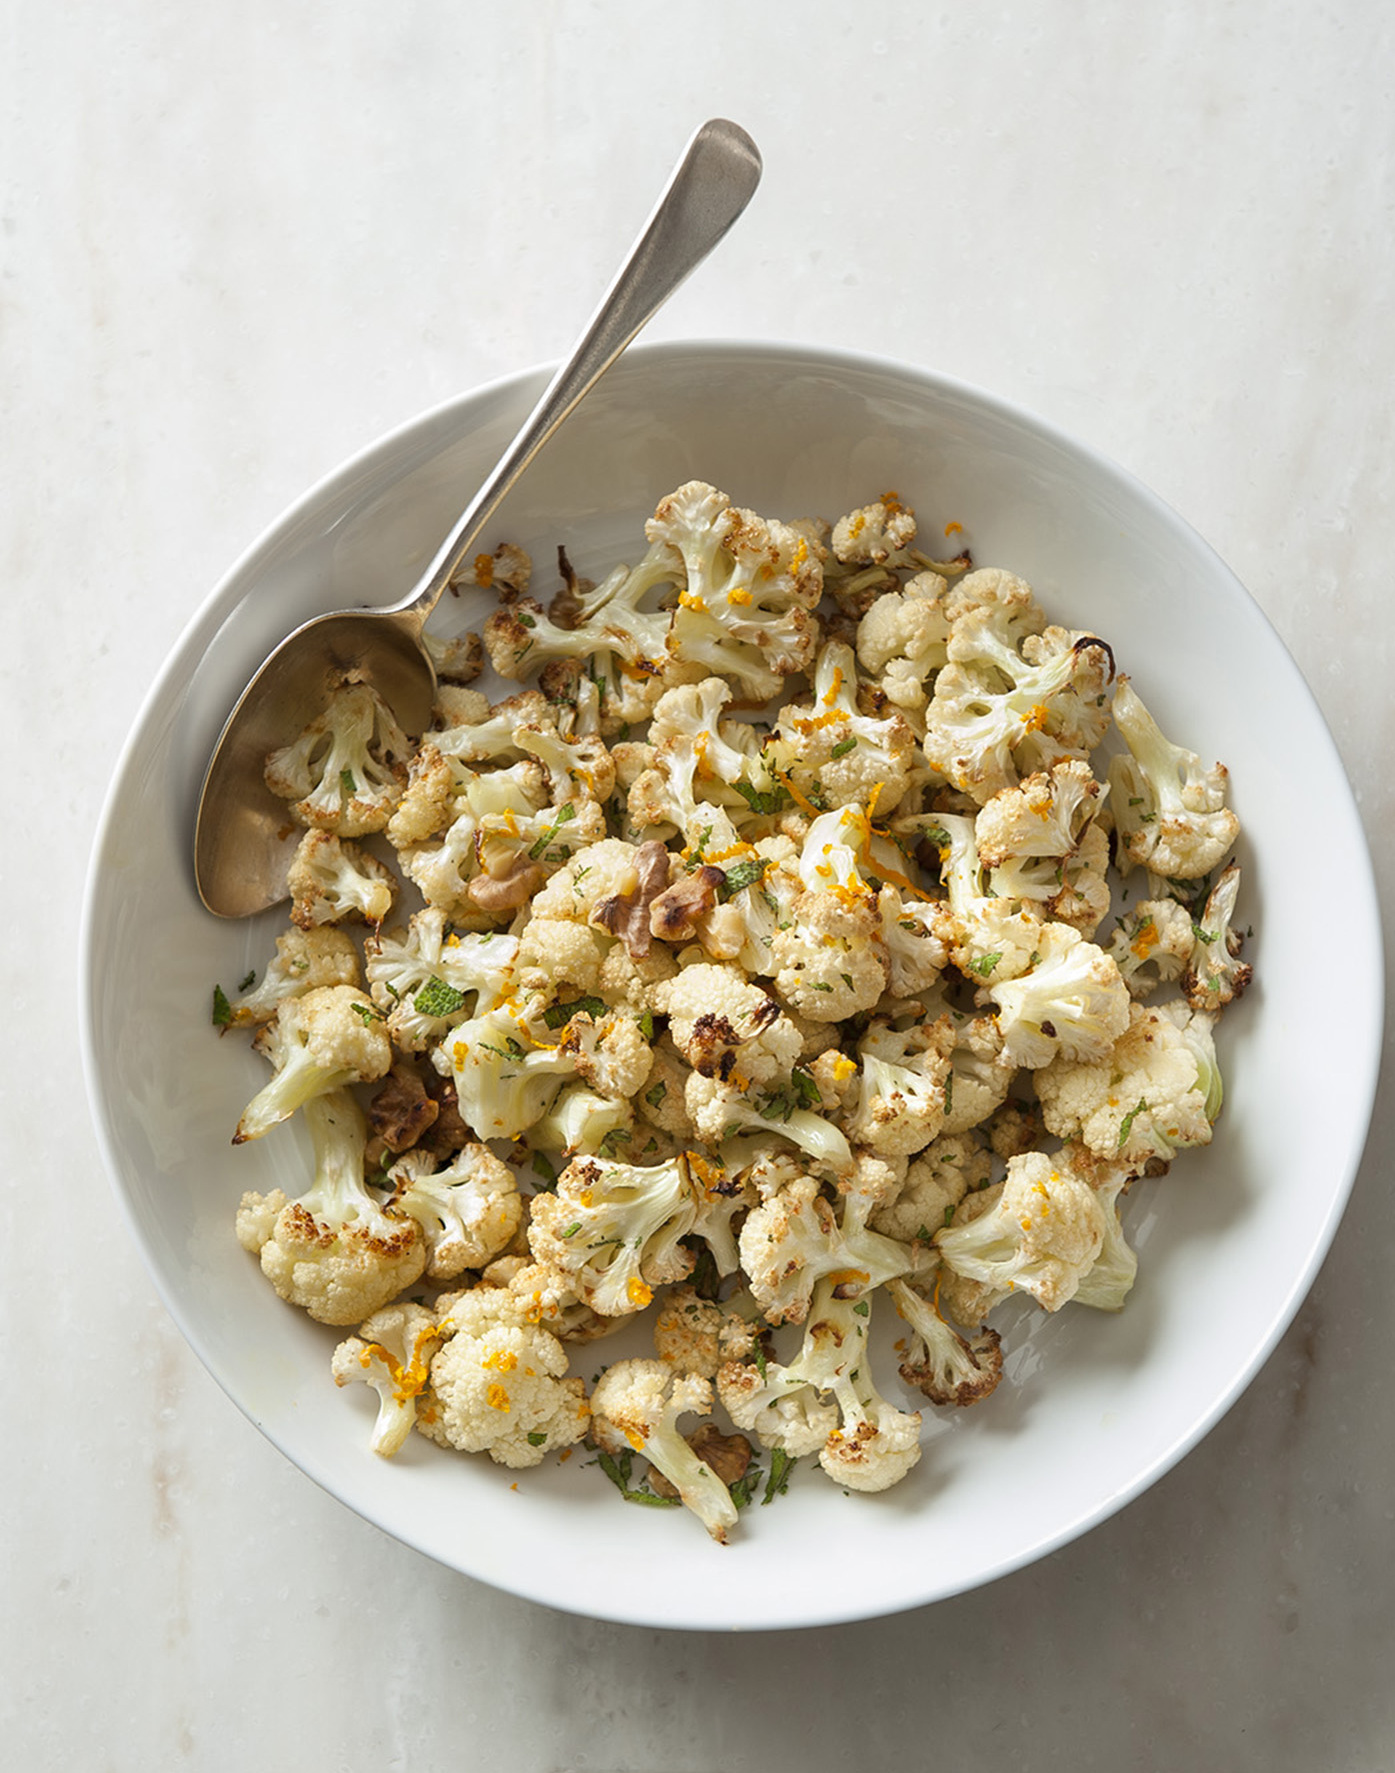
Roasted to a toasty, crispy, deep brown, cauliflower’s starchy crevices turn all caramelized and nutty. This pale white cruciferous vegetable is better suited to roasting than it is to boiling or steaming into a limp, watery mass. When cauliflower is roasted, its subtle sweetness and slightly bitter edge turn robust and the texture becomes meaty.
What’s more, roast cauliflower is as delicious served at room temperature as it is sizzling hot from the oven. It makes a terrific side to roast chicken or lamb and is surprisingly perfect with seared scallops and shrimp because they, too, are naturally sweet.
But we’ve found that roasted cauliflower is so delicious it can take center plate. I admit that when I’m on my own, the recipe that follows, meant for four, actually yields just one very hearty serving.
For a main dish, top roasted cauliflower with crushed nuts or toasted breadcrumbs or sharp cheese and present on polenta, or toss it with dried fruit and a dash of lemon or orange juice and serve on saffron rice. Leftovers, if you have them, are great in a salad with chopped apples or pears and walnuts in a sharp vinaigrette.
These days, our farmers markets offer an array of colorful cauliflower with names such as “cheddar,” “orange bouquet,” “graffiti” or “purple cape” (both deep violet) and green (sometimes called “broccoflower”).
Because it is a member of the brassica family, cauliflower contains a ton of phytochemicals and antioxidants. But the main selling point is its delicious ease and versatility. So, double this recipe: Two roasted heads are always better than one.
Roasted Cauliflower
Serves 4 to 6.
Note: From Beth Dooley.
• 1 whole cauliflower, stem removed and trimmed, broken into florets
• 2 tbsp. extra-virgin olive oil
• 1 tbsp. coarse salt
• 2 tbsp. fresh orange juice
• 1 tbsp. orange zest
• 1/4 c. dried cranberries, optional
Directions
Preheat oven to 450 degrees. In a large bowl, toss the florets with the oil and spread out on a baking sheet so they do not touch. Sprinkle with the salt.
Roast, rotating the pan halfway through and stirring the florets, so that they are browned all over, about 20 to 25 minutes.
Transfer the cauliflower to a platter and drizzle with the orange juice, sprinkle with the zest and the dried cranberries, if using. Serve hot or at room temperature.
Nutrition information per each of 6 servings:
Calories 68 Fat 5 g
Sodium 970 mg Sat. fat 1 g
Carbs 6 g Calcium 24 mg
Protein 2 g Chol 0 mg
Dietary fiber 2 g
Diabetic exchanges per serving: 1 vegetable, 1 fat.
Roasted Root Vegetable Hash
Make hash from roasted vegetable leftovers
Plan ahead when you're roasting vegetables so there are extras for other meals, including our favorite, roasted vegetable hash.

Who can resist roasting all those wonderful autumn vegetables? The beets, squash, pumpkins, carrots, parsnips, rutabagas? Roasting these dense, earthy vegetables concentrates their sweet nature by drawing forth their sugars to brown the edges into a lovely caramel finish.
The thing is, I always overdo it and make far more than we can ever finish at one sitting. So we eat them throughout the week after I stir them into soups and stews, toss them into salads and scatter them on top of pizzas and open-face sandwiches. Now that we’re revving up for the holidays, it’s good to have a few easy recipes for simple dinners and last-minute guests. When I roast extra vegetables for a party, it’s nice to have them at the ready for a meal the next day so I don’t have to cook.
Here are some tips for the best way to roast autumn’s bounty, as well as ways to enjoy each last bit.
Tips for roasting vegetables:
• Preheat the oven and the roasting pan so that the vegetables hit a hot surface before they go into the oven. This expedites the process and helps make sure they’ll be evenly browned.
• Be sure the vegetables are cut approximately the same size so that they roast evenly and in the same amount of time.
• Spread them out on the pan so they don’t touch. This allows the air to circulate so that the edges crisp.
• Shake the pan halfway through roasting so the veggies don’t stick.
• Rotate the pan several times so that they cook evenly.
• Be sure they’re nicely browned.
Tips for using roasted vegetables:
• Toss with hot pasta, a little extra olive oil, sharp aged cheese.
• Arrange on dark greens and dress with maple mustard or honey mustard vinaigrette and a handful of toasted nuts.
• Stir into your favorite prepared soups or stews.
• Scatter over pizza or hot open-faced sandwiches.
• Best? Turn them into hash. Sometimes, we add a bit of ham, or turkey or (even better) bacon. These are terrific finished with fried or poached eggs. It takes but a minute to reheat the veggies in a heavy skillet so that they crisp up for an especially delicious casual dinner or special brunch.
Think of all those holiday festivities coming up, dream of all those leftovers, and think roasted vegetable hash.
Roasted Vegetables
Serves 8 to 10 (so plenty for leftover hash).
• 1 small whole acorn squash, peeled, halved, seeded and diced into 1/2- in. pieces
• 2 medium carrots, diced into 1/2-in. pieces
• 3 small beets, peeled and diced into 1/2-in. pieces
• 1 large parsnip, peeled and diced into 1/2-in. pieces
• 2 small Yukon Gold potatoes, diced into 1/2-in. pieces
• 2 tbsp. extra-virgin olive oil
• 1/2 tsp. coarse salt
Directions
Preheat oven to 400 degrees. Preheat 2 rimmed baking pans until hot, about 3 to 5 minutes.
Toss the vegetables with the oil and salt, and scatter over the preheated baking sheets. Roast in the oven, shaking the pan occasionally and turning it once, until the vegetables are golden and begin to brown, about 45 to 60 minutes.
Serve hot. Save leftover roasted vegetables, once they’ve cooled, in a covered container in the refrigerator.
Roasted Root Vegetable Hash
Serves 4.
Note: Use any combination of roasted vegetables and add a little cooked bacon or sprinkle with shredded cheese for a more substantial dish. From Beth Dooley.
• 1 tbsp. olive oil
• 2 to 3 c. mixed roasted vegetables
• 1 tsp. fresh thyme
• 1 tbsp. butter
• 4 eggs
Directions
Set a medium heavy skillet over medium heat and warm the oil. Add the vegetables and fresh thyme, and stir to heat through and crisp, about 3 to 5 minutes. Arrange on a serving platter or individual plates.
Set a separate skillet over medium heat, melt the butter and swirl it to coat the pan. Crack the eggs into the skillet, cover and cook until the yolk is just set, about 1 to 3 minutes. Remove the lid. Using a spatula, carefully transfer the eggs to the hash. Serve hot.
Butternut Squash and Bean Soup
Add squash to your bean soup
This pairing goes well with those chillier days and nights.

As soon as temperatures drop, squash figures big in my kitchen, especially when it comes to warming soups. Think rich, thick bisques of puréed roasted squash seasoned with curry or ginger, lush with coconut cream. Or, how about a hearty vegetable combo, bright with bell peppers and emerald kale? Squash is the lazy home cook’s dream.
Squash, in all shapes and sizes, is ubiquitous throughout the world, easy to grow and highly nutritious. It works well in a range of cuisines — Asian, African, Italian, Mexican — the possibilities for seasoning are endless. Granted that all the different varieties of squash are delicious with subtle variations in flavor and texture, but I favor butternut squash for soup. I’m fond of its earthy-sweet nature and dense, creamy texture. Its skin is smooth, unlike the bumpy turban or ridged acorn squash, so it’s relatively easy to peel.
When shopping for any kind of squash, look for a firm, hard rind. This allows it to last longer, especially when stored in a cool, dark, dry place. Choose a squash that is heavy for its size with a stem that’s intact. Generally, it should be firm and dry, its color rich without any hints of green. The surface should be dull and matte; a shiny skin indicates the squash was picked too early. Avoid cracks and soft spots that can lead to mold.
If there’s a challenge to working with squash, it’s in the peeling. The frequent mistake is to attack the squash with a standard vegetable peeler. A quicker and more reliable method is to cut the squash into wedges, then rest each wedge on a cutting board and, using a sharp, heavy knife, remove the peel and seeds. You’ll take some of the flesh with it, but given the size of most butternuts, that’s OK.
Roasting big hunks of squash takes about 30 to 40 minutes. Cut into chunks, squash cooks in about 20 minutes in a soup or stew and contributes a light subtle sweetness to the stock. Roasting chunks of squash draws out its unctuous texture and caramel flavors, in about 20 to 25 minutes time. When those chunks of roasted squash are lacquered with maple syrup and topped with whipped creamy, they make a fine dessert.
These days, farmers markets are exploding with peppers, dark greens that are nearing the end of their season while squashes and root vegetables are coming on full. This soup brings them all together in one big, bright bowl.
Butternut Squash and Bean Soup
Serves 4 to 6.
Note: Butternut squash contributes an earthy, subtle sweetness to the stock, while the beans are creamy and add body to this hearty dish. Pair it with crusty bread and a tossed salad for a meal. From Beth Dooley.
• 2 tbsp. olive oil
• 1 medium onion, minced
• 2 garlic cloves, minced
• 2 tsp. chopped fresh sage
• 3 c. peeled, seeded and cubed squash (cut into 1-in. chunks)
• Salt and freshly ground black pepper to taste
• Generous pinch red pepper flakes
• 2 tbsp. tomato paste
• 1/2 c. dry red or white wine
• 5 to 6 c. chicken or vegetable stock
• 1 c. cooked or canned white beans, drained
• 1 large bell pepper, seeded and cut into 1-in. pieces
• 1 c. thinly sliced kale
Directions
In a large deep pot, heat the oil over medium and sauté the onions, garlic and sage until just tender. Stir in the squash, a generous pinch of salt, pepper and red pepper flakes, and the tomato paste. Then add the wine and stock. Increase the heat and bring to a boil, then reduce the heat to a simmer. Cook, partially covered, until the squash is tender, about 25 minutes.
Stir in beans, bell pepper and kale; heat through. Adjust seasonings to taste before serving.
Nutrition information per serving:
Calories 160 Carbohydrates 21 g Protein 8 g Fat 6 g Saturated fat 1 g Cholesterol 0 mg Sodium 160 mg
Total sugars 4 g
Dietary fiber 5 g
Exchanges: 1 starch, ½ carb, 1 lean protein, ½ fat.
Try a new (old) vegetable: romanesco (it's the green cauliflower) Is it broccoli? Is it cauliflower?

METTE NIELSEN - Whole Roasted Romanesco With Curry Butter
Romanesco, sometimes called "romanesco broccoli" or "broccoflower," is the darling of the brassica family that includes cabbage, kale and cauliflower.
While often likened to broccoli, it's not a broccoli, but a hybrid cauliflower. Chartreuse in color, it has a flavor that is a bit milder than cabbage yet more assertive than cauliflower, with subtle yet distinct nutty taste.
Its intricate nubby spiral pattern is the perfect example of Fibonacci's mathematical observations of nature. Each of the florets of a romanesco is a smaller version of the larger spine on which it grows. This funky appearance is sure to entice even the pickiest of eaters to go ahead and "take a taste."
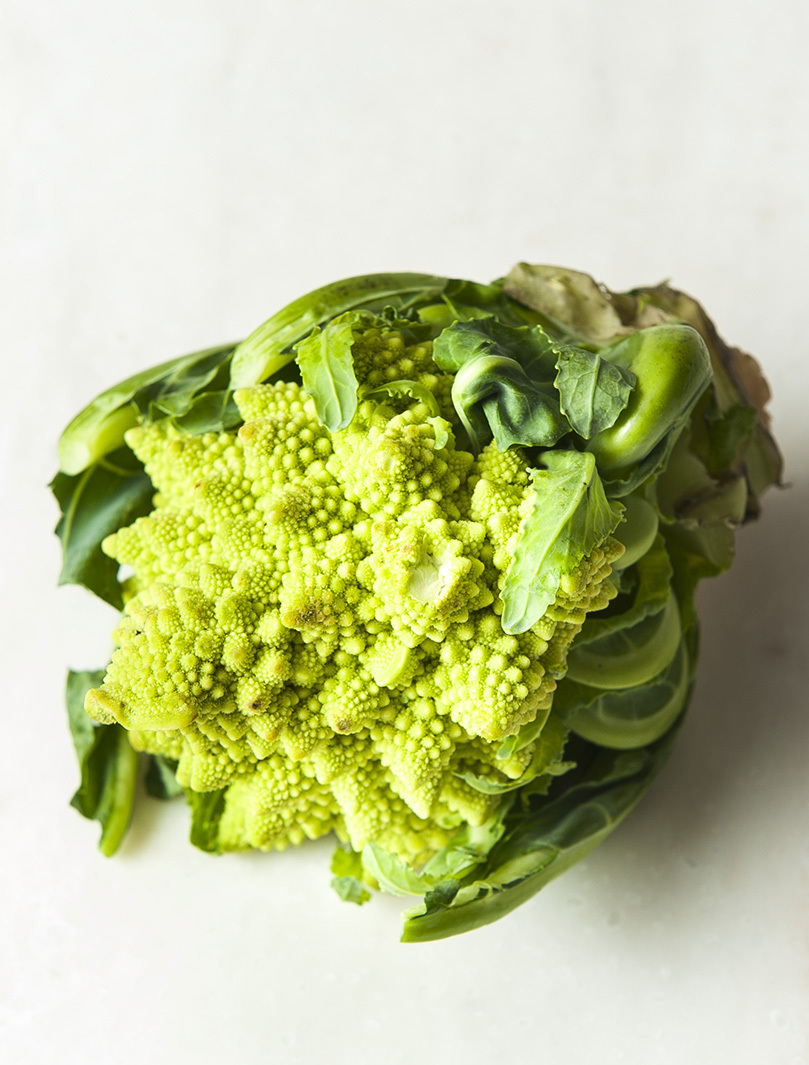
Romanesco (Green cauliflower)
Right now, farmers markets and produce aisles are stocked with this fascinating vegetable that hails from the Lazio region of Italy and was once enjoyed by ancient Romans. It arrived in the U.S. in the early 1990s, but only recently has become popular enough for farmers to grow for consumer markets.
When choosing romanesco, look for vibrant-colored full and heavy heads with firm, solid stems that show no signs of wilting. The leaves attached to the base should be perky and bright. When you bring the romanesco home, place a damp kitchen towel or paper towel over the head and store it in a perforated plastic bag in the refrigerator, stem up. Condensation on the florets causes discoloration and decay.
Enjoy this pretty vegetable as you would in any recipe calling for cauliflower. The florets may be broken, then blanched quickly and chilled for use in salads and on the appetizer trays or tossed into stir-fries and sautés. They're fabulous roasted; to do so, simply drizzle the florets with a little oil and sprinkle with salt, spread on a baking sheet and put into a hot oven until they turn a deep caramel brown; serve splashed with fresh lemon juice. A sprinkle of toasted almonds or hazelnuts highlights romanesco's distinctive nutty, earthy flavor.
The whole head is so remarkable that I hate to break it up, especially because unlike cauliflower, the romanesco will stay intact and retain its dense texture when cooked whole.
To serve, cut the head into wedges, as you might a cake, and finish with a light cream or cheese sauce or seasoned melted butter.
The bottom leaves are delicious, so don't cut them off — just trim the stem so that it balances upright. The only trick is not to overcook, because you want the vegetable to retain its shape and not turn to mush when it's cut. Serve it tableside on a bed of rice, barley or wild rice, and pass additional sauce alongside.
Turkey 101: Three ways to cook the bird
How many ways are there to cook a turkey? More than you might imagine.

ANDREW SCRIVANI - NEW YORK TIMES
In kitchens around the country, the big bird itself is the focal point of discussion.
Like autumn's leaves, advice for cooking Thanksgiving's turkey is swirling all over the internet. Is there really a best way to roast this bird? Depends on what matters most to the cook.
Fastest? Simplest? Showiest? Here are three very different techniques that all yield terrific turkeys.
Fastest
Yes, you can cook a turkey relatively quickly. But first you need to cut it into parts. That's the approach taken by Joe Zahner, a St. Louis Park chef and senior manager at Sodexo, the Paris-based food-service management company. He demonstrates this in one of his cooking videos, which his son Dominic produces. In "Joe Knows: Turkey," Zahner explains how to cook a 14-pound turkey in less than an hour by cutting the turkey into pieces (legs, breast, wings, etc.), which he then roasts.
"These cuts cook in about the same amount of time," Zahner said. "If you follow the instructions for the stock and the gravy, you've got it all timed to be done at once. This is what chefs do when they're cooking a lot of turkeys for a restaurant's Thanksgiving."
On his video, Zahner also shows how to make a richly flavored stock with the back, neck and wing tips that can be roasted ahead of time. He turns the stock into a base for a lush gravy.

Chef Joe Zahner
The upside to this method is tender, moist meat. The downside is there is no intact turkey to carve at the table. But who carves at the table anymore? Find Zahner's turkey technique, and more of his videos, at https://vimeo.com/191670671.
Joe's technique
Using a very sharp knife, cut up the turkey, separating breast, thigh, wings and legs. If you're making stock for gravy, cut off the wing tips to use and sprinkle them, along with neck and back with salt and pepper and roast until done in a 350-degree oven. Do this in advance of the turkey, if you want to get ahead of the meal.
For Thanksgiving dinner: Generously season all sides of the breast, legs and thighs and wings with dried thyme, salt and pepper and, before roasting, refrigerate for at least an hour (or 30 minutes at room temperature) to let the seasoning get into the meat before it is cooked. (You could make stock at this point by simmering the roasted wing tips, neck and back with onions, carrots, celery, parsley, bay leaves and thyme for about an hour.)
Place the meat on a rimmed baking sheet. Roast the meat until it reaches 165 degrees on a meat thermometer, about 1 hour. Remove all meat from the oven. Allow the turkey to sit at least 10 minutes before slicing. Easiest
This high-heat method, introduced by food writer Barbara Kafka, blasts the turkey in a very hot oven. This crisps the skin, and drives out excess fat and water so the meat stays juicy and moist. There's no basting, which tends to soften the skin and keep it from crisping; no messy, tricky turning the turkey from side to side or upside down (so the juices run off), and the meat doesn't overcook. It works well for smaller turkeys, 12 to 14 pounds.
The method requires a very heavy metal roasting pan. Thin enamel or disposable aluminum roasting pans aren't strong enough to take the heat, and the rendered fat and drippings burn on contact. It also requires a very clean oven or there will be a great deal of smoke. At 500 degrees, the turkey fat tends to spatter so, after about 30 minutes, I reduce the temperature to 400 degrees, which is still plenty hot, but less messy. A 12- to 14-pound turkey cooks in about 1 ½ hours and emerges tender, moist and golden-brown.
High-heat technique (adapted from "Roasting: A Simple Art," by Barbara Kafka)
Before you begin, be sure the oven is very clean. Open the windows as there's often some smoke. Lower the oven rack to the lowest position.
Preheat the oven to 500 degrees. Rinse the turkey inside and out, and pat very dry. Sprinkle it inside and out with salt and pepper.
Put the turkey, breast side up, in a V-shaped roasting rack set in a roasting pan. Add 1 cup of water or stock to a roasting pan and put the turkey into the oven. After about 30 minutes, reduce the heat to 400 degrees. The turkey is cooked when a thermometer inserted into the thigh reaches 165 degrees, about 1 ¼ to 1 ½ hours. Remove and allow to stand at least 20 minutes before carving.
Showiest
Using this traditional method, the turkey roasts slowly and is basted often. First, though, it's rubbed with a dry brine of salt and seasonings that permeate the meat to keep it moist and infuse it with flavor. This is easier and less messy than a wet brine. The turkey begins roasting with the breast upside down so the underside cooks before it's flipped and basted frequently, to a beautiful finish. A 12- to 14-pound turkey will take about 2 ½ hours to cook, but the results are worth the wait.
Traditional technique: Dry brine (and plan ahead)
About 3 to 4 days before roasting, rinse the turkey inside and out and pat dry. For a 12- to 14-pound turkey, mix together ¼ cup salt, a generous pinch of paprika, 1 teaspoon grated orange rind and 2 teaspoons chopped fresh thyme. Rub the seasoning all over the turkey. Place the turkey in a 2 ½-gallon sealable plastic bag, pressing out the air. Put it in the refrigerator for 2 to 3 days. Remove the turkey from the bag, and set it in a pan or on a deep plate and refrigerate overnight, uncovered.
Preheat the oven to 450 degrees. Baste the turkey with 2 tablespoons melted butter and set it breast-side down on a V-shaped roasting rack set in a roasting pan; place it in the oven. After 30 minutes of roasting, remove turkey from oven and, using oven mitts or towels to protect your hands, carefully flip the turkey so the breast is facing up.
Reduce the heat to 350 degrees. Return the turkey to the oven and roast, basting with the pan juices every 30 minutes or so, until a thermometer inserted into the thigh reads 170 degrees, about 2 ½ hours. Remove the turkey and allow to stand at least 30 minutes before carving.
General tips (regardless of method)
• Rinse the turkey thoroughly and pat dry before roasting. Better yet, set the rinsed, patted turkey on a deep platter or in a pan and refrigerate overnight. This draws out excess moisture so the skin roasts up crisp and crackly.
• Bring the turkey to room temperature before roasting to ensure that it cooks evenly.
• Always check for doneness by using a meat thermometer. Insert the thermometer into the thickest part of the thigh, but not touching the bone. It should read 165 degrees; the turkey will continue to cook after it's removed from the oven.
• Allow the meat to rest at least 30 minutes so that the juices redistribute throughout.
Lemony Shaved Brussels Sprouts Salad
Brussels sprouts are the new kale
Roasted or served up raw in a salad, mini cabbages offer lots of flavor with little fuss.

I used to think that the best way to enjoy Brussels sprouts was to roast them to a dark, caramel fare-thee-well. I’d toss them with a little oil and salt, then blast them in a hot oven, so that they’d emerge crisp and sweet, the perfect finger food to pick right off the pan.
But the other night, running short on time and long on Brussels sprouts, I decided to shred them quickly and treat them with plenty of good peppery olive oil, lemon juice, a hit of mustard, lots of garlic, shreds of creamy aged Gouda and toasted almonds for crunch. The result was simplicity itself. Fresh and bright tasting, this surprisingly easy, flavor-packed salad was just right with the bowl of hefty chili we served alongside.
Brussels sprouts look like mini green cabbages that seem fit for fairy-tale trolls. Right now, they’re at the peak of their season because a recent frost in the fields has sweetened them a bit. Sprouts react to cold weather by producing more sugars. You can find them at the farmers markets sold on their stalks, resembling a troubadour’s “jingle stick.”
When shopping for Brussels sprouts, look for bright green heads that are firm and heavy for their size. The leaves should be tightly backed. Avoid those with yellowing leaves or black spots.
I prefer the smaller Brussels sprouts because they tend to be milder tasting, while the larger sprouts are more cabbage-like. They’re equally good purchased on or off their stems. Store Brussels sprouts in a bowl or unlidded container in the refrigerator. The outer leaves will wilt a little in the open air, but the inner part of the sprout will remain protected. Plastic bags tend to trap moisture and quicken the sprouts’ demise.
To prepare Brussels sprouts, trim off and discard the dry part of the stem at the base as well as any outer leaves.
I’m still a fan of roasting Brussels sprouts in a hot oven to drizzle with balsamic vinegar or lemon juice for a side dish or to toss into pasta or scatter on pizza. They’re also terrific shredded and fried in butter for hash to top with a poached egg and bacon or crumbled feta cheese.
Brussels sprouts are the darlings of my kitchen — the new kale.
Lemony Shaved Brussels Sprouts Salad
Serves 4 to 6.
Note: Shave the Brussels sprouts very thin for a delicate slaw. This is most easily done in a food processor, but the rough look of hand-slicing with a sharp knife is really nice. This recipe calls for aged Gouda cheese, but a nice Pecorino or Parmesan is delicious as well. To toast the almonds, spread on a baking sheet and toast in a preheated 350-degree oven until just lightly browned, about 3 to 5 minutes. Remove and allow to cool. The salad can be made ahead and will keep in a covered container for a day in the refrigerator. From Beth Dooley.
• 3 tbsp. fresh lemon juice
• 2 tsp. coarse mustard
• 1 garlic clove, crushed
• 1/4 c. extra-virgin olive oil
• 1 1/2 lb. Brussels sprouts, discolored or wilted leaves discarded and bottoms trimmed.
• Salt and pepper to taste
• Pinch red pepper flakes
• 1/4 c. shredded aged Gouda cheese (see Note)
• 1/4 c. blanched sliced almonds, toasted (see Note)
Directions
In a small bowl, whisk together the lemon juice, mustard and garlic, then whisk in the oil in a slow, steady stream.
Put the Brussels sprouts into a large bowl and toss in the vinaigrette to coat the leaves. Season to taste with the salt and pepper and the red pepper flakes. Toss in the cheese. Serve garnished with the sliced toasted almonds.
Nutrition information per each of 6 servings:
Calories 170 Fat 13 g Sodium 80 mg
Carbohydrates 11 g Saturated fat 2 g Total sugars 3 g
Protein 6 g Cholesterol 5 mg Dietary fiber 4 g
Exchanges per serving: 2 vegetable, 2 ½ fat.
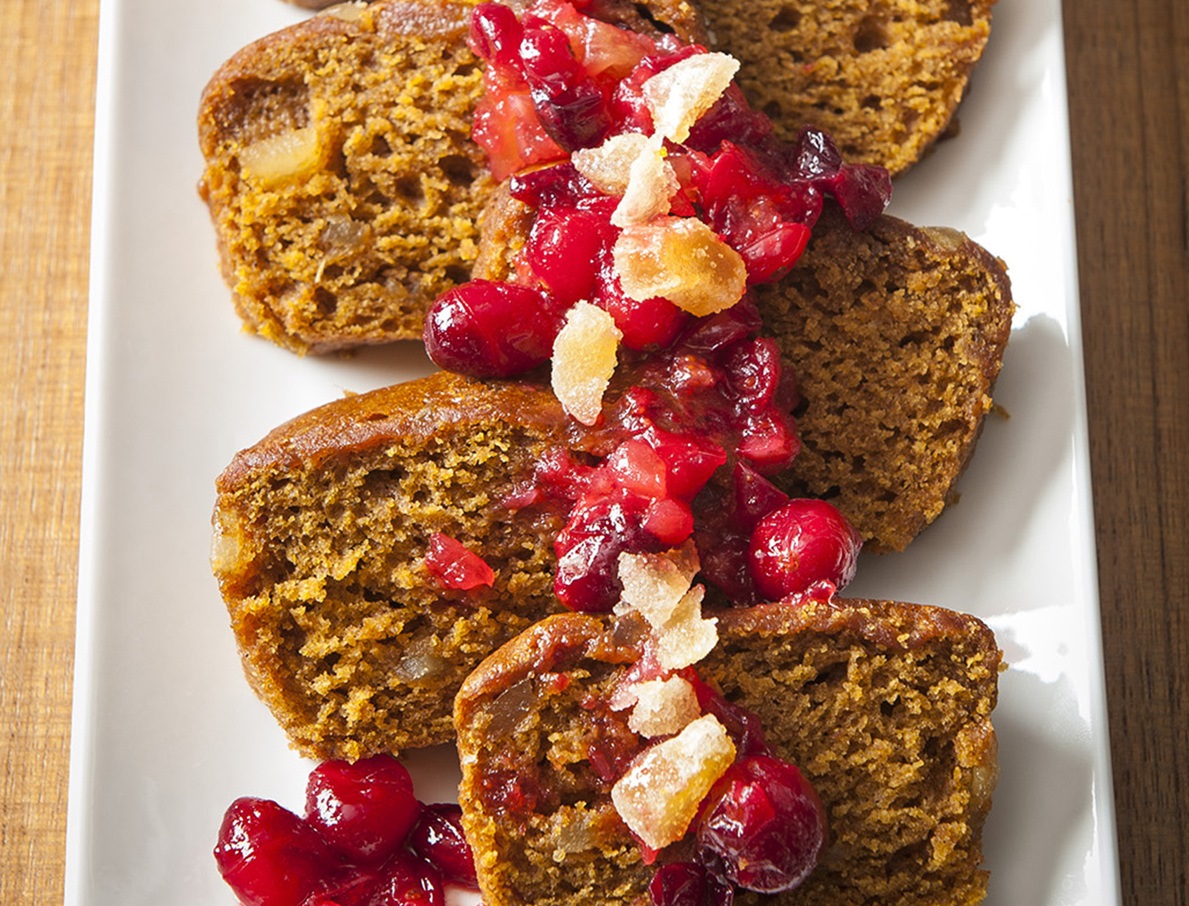
Three ways to use cranberries
Double Ginger Mini-Loaves, Very Fresh Cranberry Relish, and Cranberry Ginger Sauce

Right now, my kitchen is full of comforting holiday smells. Gingerbread studded with tangy cranberries, just pulled from the oven, is cooling on the counter.
Most years, I’m scrambling to make last-minute gifts for friends and family members. But this time I’m not letting my holiday goodies get away from me. These mini ginger-cakes actually taste better when made in advance, allowing time for the spices to mellow. They’re so rich with butter and molasses that they’ll stay moist for several weeks. They’re especially good served with dollops of cranberry sauce sparked with chunks of homemade candied ginger.
Wisconsin is the fresh cranberry capital of the world. Though production is higher in New Jersey and Massachusetts, their crop is pressed into juice, dried or canned. I am partial to the organic cranberries from Ruesch Century Farm in central Wisconsin and James Lake Farms in northern Wisconsin, where berries are grown without chemicals in smaller bogs. They’re available at farmers markets and our local food co-ops.
Now that it’s peak cranberry season, my sauce production is in full swing. My grandmother used a heavy metal grinder, clamped to her kitchen counter, for her fresh cranberry-orange sauce. Into the giant maw went the fresh berries with a whole orange while out came the tart relish she lightly sweetened with sugar.
These days, I rely on a food processor to do the trick, use maple sugar for complex flavors and substitute a few sweet, thin-skinned clementines for the navel oranges once used. This sauce stays fresh for at least a week in a covered container in the refrigerator. It’s delicious swirled into mayonnaise for turkey salad, as salsa for chips, and a garnish for roast chicken.
Cooking transforms cranberries into a pretty tart sauce that doubles for jam on scones, is great over vanilla ice cream or blood orange sorbet, terrific swirled into yogurt or baked into a crust. In a sauce, they thicken up as they cook because of pectin in the berries. For my recipe, the sauce is sparked with chunks of candied ginger to add not-so-sweet heat.
Fresh, local cranberries are always the best choice; they’re sweeter than frozen and require less sugar to temper their bite. The only trick is to add the sweetener after the sauce is cooked. It doesn’t matter if it’s honey, maple, white or brown sugar, adding it too soon can make the berries tough — and it’s easy to add too much. I always make a little extra sauce, as a gift to myself.
Mette Nielsen - Star Tribune
Double Ginger Mini-Loaves
Makes 2 mini-loaves (6 to 8 slices per loaf).
Note: These are just the right size for gift giving. The best part is filling the kitchen with wonderful smells. Wrap them tightly in plastic wrap and they’ll stay fresh and moist for at least a week. From Beth Dooley.
• 1 1/4 c. flour
• 1/2 tsp. ground cinnamon
• 1/2 tsp. ground ginger
• 1/4 tsp. ground nutmeg
• Pinch ground cloves
• 1/4 tsp. baking power
• 1/4 tsp. salt
• 1/2 c. mild molasses
• 1/3 c. milk
• 1/3 c. light brown sugar
• 1/2 stick (4 tbsp.) unsalted butter, melted
• 2 tbsp. grated fresh ginger root
• 1 egg
• 1/2 c. fresh cranberries
Directions
Preheat the oven to 350 degrees. Grease and flour 2 mini (3- by 5 3/4-inch) loaf pans.
In a medium bowl, whisk together the flour, cinnamon, ground ginger, nutmeg, cloves, baking powder and salt.
In a separate bowl, beat together the molasses, milk, sugar, butter, fresh ginger and egg. Beat in the flour mixture; stir in the cranberries.
Pour the batter into the prepared pans. Bake for 25 to 30 minutes, or until a toothpick inserted into the center comes out clean. Cool for 10 minutes; remove from the pans. Cool completely on wire racks before wrapping.
Very Fresh Cranberry Relish
Makes about 3 cups.
Note: Serve this zesty, bright tasting salsa with chips, swirled into mayonnaise and whisked into vinaigrette. It will keep at least a week in the refrigerator in a covered container. From Beth Dooley.
• 2 unpeeled clementines, halved and seeded
• 1 1/2 c. fresh cranberries
• 1/2 to 3/4 c. maple sugar or white sugar, to taste
Directions
Working in batches, purée the clementines and cranberries in a food processor fitted with a steel blade. Turn into a bowl and stir in the sugar to taste.
Cranberry Ginger Sauce
Makes 2 1/2 cups.
Note: Tangy and sweet with gingery heat, this sauce doubles as jam on scones or over ice cream. From Beth Dooley.
• 1 1/2 c. fresh cranberries
• 1/2 c. cider
• 1/4 c. chopped crystallized ginger
• 1/2 c. sugar or honey, to taste
Directions
Put the cranberries and cider into a saucepan and set over medium heat. Cook until the cranberries have just begun to pop and stir in the crystallized ginger. Continue cooking until the sauce thickens, about 3 to 5 minutes. Add the sugar or honey to taste.
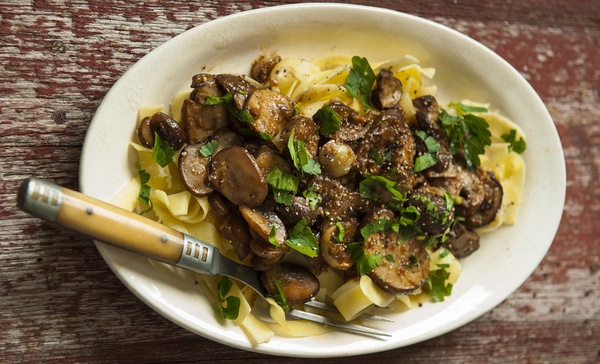
Mushroom Bourguignon
Make way for mushrooms instead of beef
Serve them for a hearty rendition of bourguignon.
Mette Nielsen
Mushrooms make a terrific stand-in for many dishes featuring beef. When sautéed in a little butter or oil for a long time, they become firmer, denser and meatier-tasting. When properly cooked, mushrooms enrich soups, stews and sauces and are terrific in such classics as Beef Bourguignon.
The best way to cook mushrooms is in a skillet in small batches, giving them enough space. This way, they release their juices and their flavors condense. Do not throw a whole pound of mushrooms into the skillet and crowd the pan because they will become soggy as they stew together and turn into a rubbery mass.
Given more room in the skillet, they will caramelize and develop a deep, nutty taste. It takes patience and time. Mushrooms crowded in the pan and undercooked, I think, is the real reason some people say they don’t like them.
Our co-ops and grocers offer plenty of good cultivated varieties of mushrooms — portobello, cremini (baby portobellos) and shiitake.
It’s best to buy mushrooms whole, not sliced or cut and packaged; they should feel moist and heavy for their size. Place the mushrooms in a paper bag in the refrigerator until ready to use.
Clean mushrooms before cooking them. It’s best not to run them under the tap because they absorb too much water. Instead, trim the stems with a paring knife and then wipe the stem and mushroom cap with a damp towel or soft brush. Alternately, you can rinse mushrooms, by dropping them into a bowl of water, lift them out and blot dry on a clean dishcloth or paper towel.
Once the mushrooms are cooked, they will keep in a covered container for several days in the refrigerator or may be frozen and ready to add to soups or stews.
Toss sautéed mushrooms with pasta or stir into rice with chopped parsley and a little cheese. Sautéed mushrooms are also delicious served on bruschetta and pizza.
Vegetarians and their friends will love this meatless bourguignon and other such mushroom creations. These dishes are lighter than the originals and just as satisfying. No one will ask, “Where’s the beef?”
MUSHROOM BOURGUIGNON
Serves 4.
Note: This hearty wintry dish comes together quickly for a weekday supper but is elegant enough for a weekend dinner party. It doubles easily and may be made ahead of time, then assembled right before serving. From Beth Dooley.
• 1 tbsp. vegetable oil
• 1 tbsp. unsalted butter
• 2 lb. cremini mushrooms, sliced
• 2 garlic cloves, minced
• 2 tsp. fresh thyme leaves
• Salt and freshly ground black pepper to taste
• Generous pinch red pepper flakes
• 1/4 c. white wine
• 1/4 c. mushroom, chicken or vegetable stock
• Cooked egg noodles for serving
• 1/4 c. chopped fresh parsley for garnish
Directions
In a large skillet over medium heat, whisk together the oil and butter until hot and bubbly. Working in batches, sauté the mushrooms until browned on all sides, about 5 to 8 minutes, removing each batch to a plate until they’re all cooked.
Whisk in the garlic, thyme and a sprinkle of salt, pepper and the red pepper flakes. Cook for 1 minute. Whisk in the wine and stock, scraping up any browned bits that stick to the bottom of the pan.
Return the mushrooms to the pan, reduce heat and simmer until the liquid has thickened, about 5 to 8 minutes. Serve over cooked egg noodles and serve garnished with parsley.